
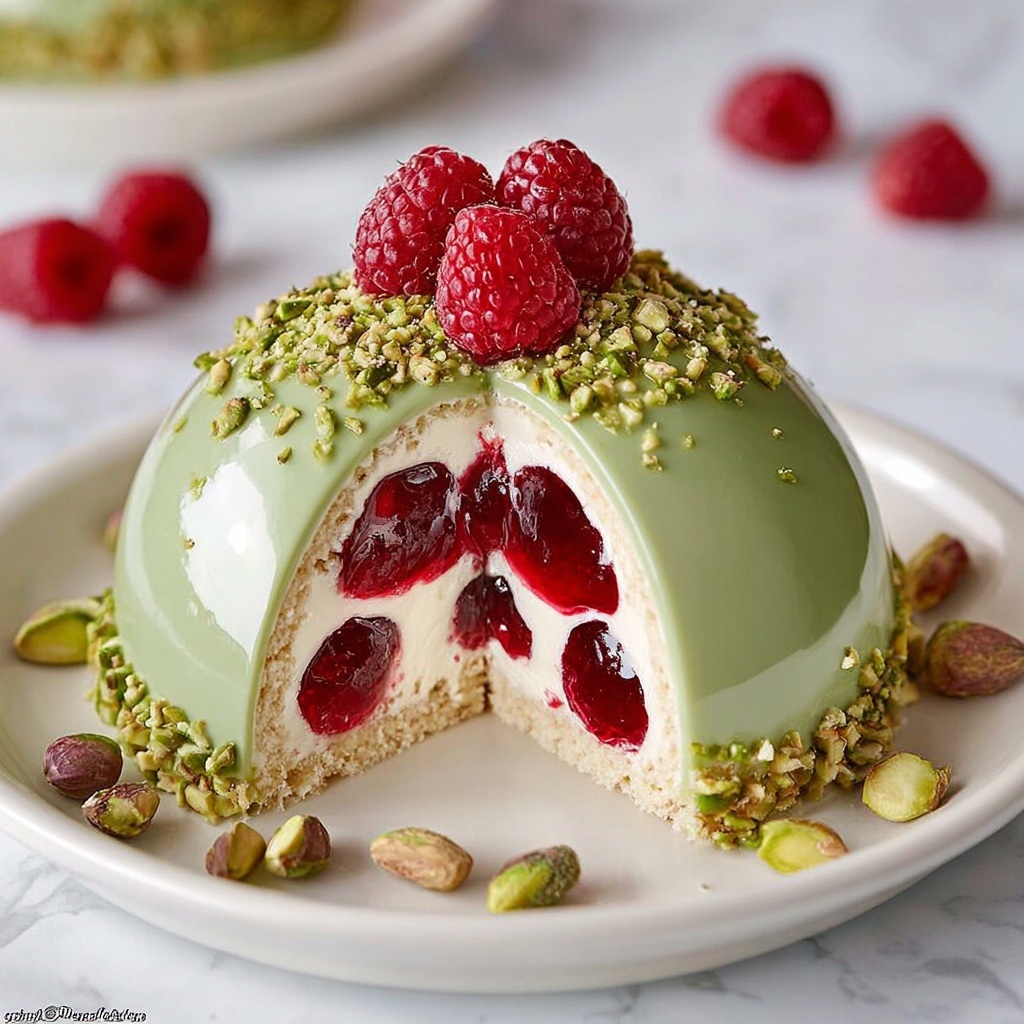
If you are looking for a show-stopping dessert that combines elegance with irresistible flavors, look no further than the Pistachio Raspberry Cheesecake Domes Recipe. This no-bake delight features creamy pistachio-infused cheesecake layers paired perfectly with a vibrant raspberry puree, all nestled atop a buttery biscuit base. Each bite offers a wonderful balance of tangy sweetness and nutty richness, presented in charming dome shapes that are as delightful to look at as they are to eat.
Ingredients You’ll Need
This Pistachio Raspberry Cheesecake Domes Recipe uses simple, wholesome ingredients that come together effortlessly to create a dessert bursting with flavor and texture. Every item in the list plays a crucial role—whether it’s adding crunch, creaminess, sweetness, or that fresh pop of raspberry.
- Digestive Biscuits or Graham Crackers (100 g): Crushed to form a crisp and buttery base, essential for structure and crunch.
- Melted Butter (3 tbsp): Binds the biscuit crumbs together and adds richness to the crust.
- Full-Fat Cream Cheese (200 g, softened): The creamy heart of the cheesecake, giving it that luscious texture.
- Powdered Sugar (⅓ cup): Sweetens the filling without graininess, keeping it smooth.
- Pistachio Paste or finely ground pistachios (2 tbsp): Imparts a distinct nutty flavor and lovely green tint to the cheesecake.
- Vanilla Extract (½ tsp): Enhances the overall flavor with a warm, sweet aroma.
- Lightly Whipped Cream (100 ml): Adds lightness and fluffiness to the filling, balancing the rich cream cheese.
- Fresh or Frozen Raspberries (¾ cup): The star of the raspberry layer, providing tartness and vibrant color.
- Sugar or Honey (1 tbsp): Sweetens the raspberry puree perfectly.
- Optional Lemon Juice: Adds a touch of brightness to the raspberry layer, balancing sweetness.
- Crushed Pistachios and Fresh Raspberries: For garnishing and adding appealing texture and freshness.
How to Make Pistachio Raspberry Cheesecake Domes Recipe
Step 1: Prepare the Raspberry Layer
Start by cooking your raspberries with sugar until they release their juices, then blend the mixture smoothly and strain to remove the seeds. This raspberry puree needs to cool completely before using, ensuring it sets beautifully between the cheesecake layers and provides that tangy-sweet contrast to the creamy pistachio filling.
Step 2: Make the Biscuit Base
Crush the digestive biscuits or graham crackers finely, then mix them with melted butter to create a cohesive crumb mixture. Press this mixture firmly into the bottom of silicone dome molds to form a sturdy base. Chilling the crust for 15–20 minutes helps it set and hold its shape once filled.
Step 3: Prepare the Cheesecake Filling
Whip the room-temperature cream cheese until it’s luxuriously smooth, then blend in powdered sugar, pistachio paste, and vanilla extract for flavor depth. Finally, gently fold in the lightly whipped cream to lighten the texture, making the filling fluffy and indulgent without losing richness.
Step 4: Assemble the Domes
Layer the mixture carefully inside the molds by starting with a scoop of cheesecake filling, followed by a layer of chilled raspberry puree, then topping it off with more cheesecake. Use a spatula to smooth the tops so your domes will look flawless once unmolded. This beautiful layering is what makes the Pistachio Raspberry Cheesecake Domes Recipe visually stunning.
Step 5: Chill
Cover and refrigerate the assembled domes for at least 6 hours or, better yet, overnight. This chilling time is crucial as it allows the flavors to meld and the dessert to firm up enough to hold its dome shape perfectly when served.
Step 6: Unmold and Garnish
Carefully pop the domes out of the silicone molds, revealing their elegant shape. Finish your creation by sprinkling crushed pistachios and placing fresh raspberries on top for a burst of color, texture, and that irresistible nutty crunch that complements the creamy filling beautifully.
How to Serve Pistachio Raspberry Cheesecake Domes Recipe

Garnishes
Simple garnishes elevate these domes from gorgeous to unforgettable. Crushed pistachios add a satisfying crunch and reinforce the nutty flavor, while fresh raspberries provide a juicy, tart contrast. You can also drizzle a little honey or a dusting of powdered sugar for extra sweetness and sparkle.
Side Dishes
Serve these domes alongside a cup of rich espresso, a citrusy herbal tea, or a glass of chilled sparkling wine to balance the creaminess. Light fruit salads or refreshing mint sprigs can also complement the flavors without overwhelming the dish.
Creative Ways to Present
Try serving the domes on individual decorative plates with edible flowers or small chocolate shards for a dramatic effect. Alternatively, place them on a rustic wooden board with clusters of fresh berries for a charming, casual dessert display that will impress every guest.
Make Ahead and Storage
Storing Leftovers
Once made, these domes should be stored in an airtight container in the refrigerator where they will keep beautifully for up to three days. This makes them ideal for prepping in advance of gatherings or enjoying as a special treat over several days.
Freezing
If you want to extend their shelf life, the cheesecake domes freeze well for up to two weeks. Just wrap them individually to prevent freezer burn, and when ready to enjoy, thaw them slowly in the refrigerator overnight to preserve texture and flavor.
Reheating
Since this is a no-bake cheesecake, reheating isn’t necessary; in fact, serving chilled is best to maintain that creamy consistency and fresh taste. Simply remove from the fridge or thawed freezer storage and serve cold for the perfect dessert experience.
FAQs
Can I use a different nut paste instead of pistachio?
Absolutely! While pistachio paste gives a unique flavor and color, almond or hazelnut paste can be used for interesting variations. Just keep in mind the flavor profile will shift slightly.
What kind of cream should I use for the whipped cream?
Use heavy cream or double cream that is lightly whipped to soft peaks. This adds airiness to the cheesecake filling and prevents it from becoming too dense.
Can I make this recipe vegan or dairy-free?
With some substitutions like vegan cream cheese, plant-based whipped cream, and vegan butter, you can adapt this recipe to be dairy-free. The texture and flavor will differ but still delicious in their own right.
What is the best way to unmold the cheesecake domes?
Silicone molds make it easy: gently pull the edges away from the dessert and carefully invert each dome onto a plate. Letting them chill thoroughly helps ensure they hold their shape when removed.
How long does it take to prepare this dessert?
Active preparation takes about 25 minutes, but the domes need to chill for at least 6 hours or overnight to set properly, making it a great make-ahead dessert.
Final Thoughts
I cannot recommend the Pistachio Raspberry Cheesecake Domes Recipe enough for those special occasions or whenever you want to treat yourself and your loved ones to something extraordinary. The harmony of nutty pistachio with tart raspberry in this no-bake delight creates a memorable dessert experience that’s both elegant and comforting. Give it a try, and watch your guests’ faces light up with delight!
Print
Pistachio Raspberry Cheesecake Domes Recipe
- Prep Time: 25 minutes
- Cook Time: 8 hours (mainly chilling time)
- Total Time: 8 hours 25 minutes
- Yield: 6 servings
- Category: Dessert
- Method: No-Cook
- Cuisine: American
- Diet: Vegetarian
Description
This elegant no-bake Pistachio Raspberry Cheesecake Domes recipe combines a crunchy biscuit base with creamy pistachio-infused cheesecake filling and a vibrant raspberry layer. Perfectly chilled and beautifully presented, these domes are ideal for a sophisticated dessert that requires no baking.
Ingredients
Biscuit Base
- 100 g Digestive Biscuits or Graham Crackers
- 3 tbsp Melted Butter
Cheesecake Filling
- 200 g Full-Fat Cream Cheese (softened)
- ⅓ cup Powdered Sugar
- 2 tbsp Pistachio Paste or finely ground pistachios
- ½ tsp Vanilla Extract
- 100 ml Lightly Whipped Cream
Raspberry Layer
- ¾ cup Fresh or Frozen Raspberries
- 1 tbsp Sugar or Honey
- Optional: a few drops Lemon Juice
Garnish
- Crushed Pistachios
- Fresh Raspberries
Instructions
- Prepare Raspberry Layer: In a small saucepan, cook the raspberries with sugar over medium heat until they soften and release their juices. Blend the mixture until smooth, then strain through a fine sieve to remove seeds. Allow the raspberry puree to cool completely before using.
- Make Biscuit Base: Crush the digestive biscuits or graham crackers finely and mix with melted butter until evenly combined. Press this mixture firmly into silicone dome molds to form the base layer. Place the molds in the refrigerator and chill for 15 to 20 minutes to set.
- Prepare Cheesecake Filling: In a mixing bowl, beat the softened cream cheese until smooth and creamy. Add powdered sugar, pistachio paste, and vanilla extract, then continue to blend thoroughly. Gently fold in the lightly whipped cream to keep the filling light and airy.
- Assemble Domes: Spoon a layer of the pistachio cheesecake filling over the chilled biscuit base in each mold. Add a layer of cooled raspberry puree on top of the cheesecake layer, then finish with another layer of the cheesecake filling. Use a spatula to smooth the tops evenly.
- Chill: Refrigerate the assembled domes for at least 6 hours, preferably overnight, to allow them to set firmly and develop flavors.
- Unmold & Garnish: Carefully remove the domes from the silicone molds by gently pressing or inverting them. Garnish each dome with crushed pistachios and fresh raspberries for an attractive presentation. Serve chilled for best texture and flavor.
Notes
- Always use room-temperature cream cheese to ensure a smooth, lump-free cheesecake filling.
- Silicone molds are recommended for easy unmolding of the cheesecake domes.
- Taste the raspberry layer after cooking and adjust sweetness with additional sugar or lemon juice if desired.
- Store the cheesecake domes in an airtight container in the refrigerator for up to 3 days.
- You can freeze the domes for up to 2 weeks; thaw overnight in the refrigerator before serving.
