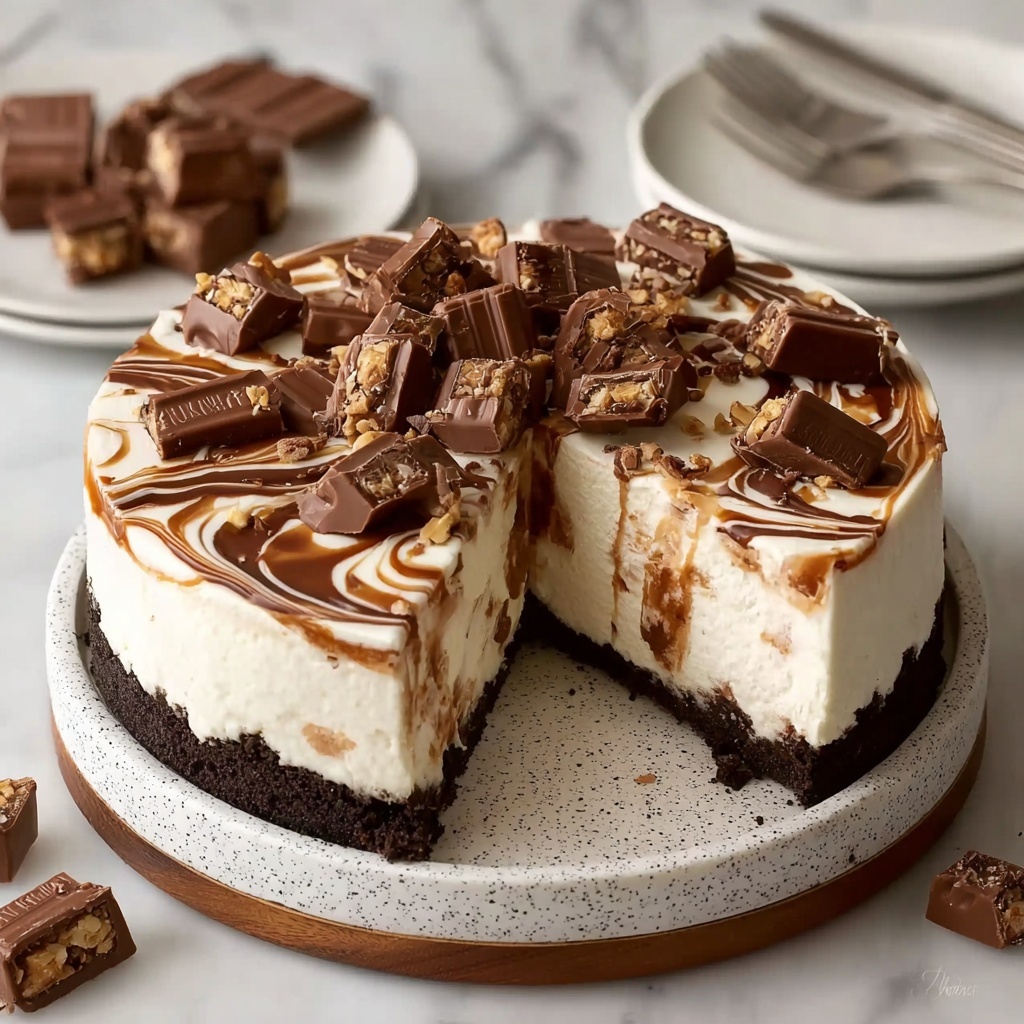
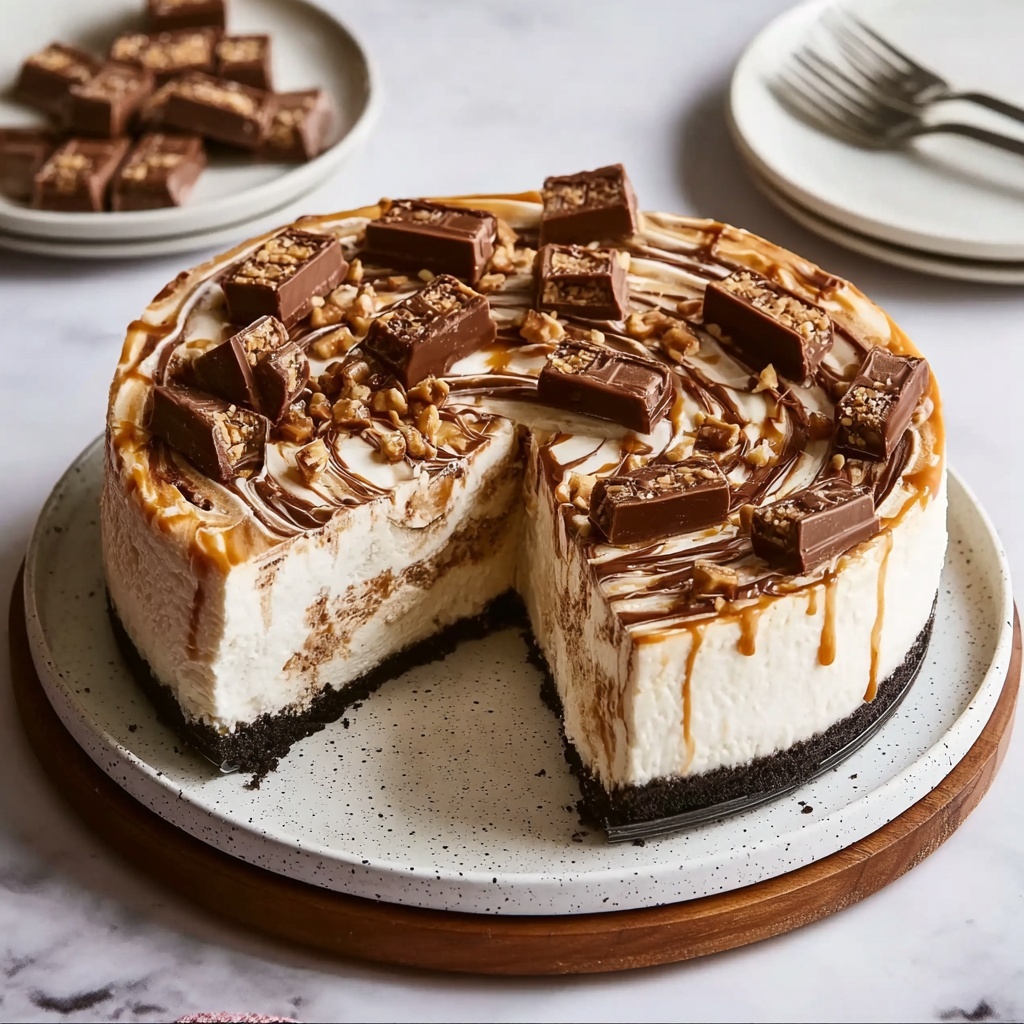
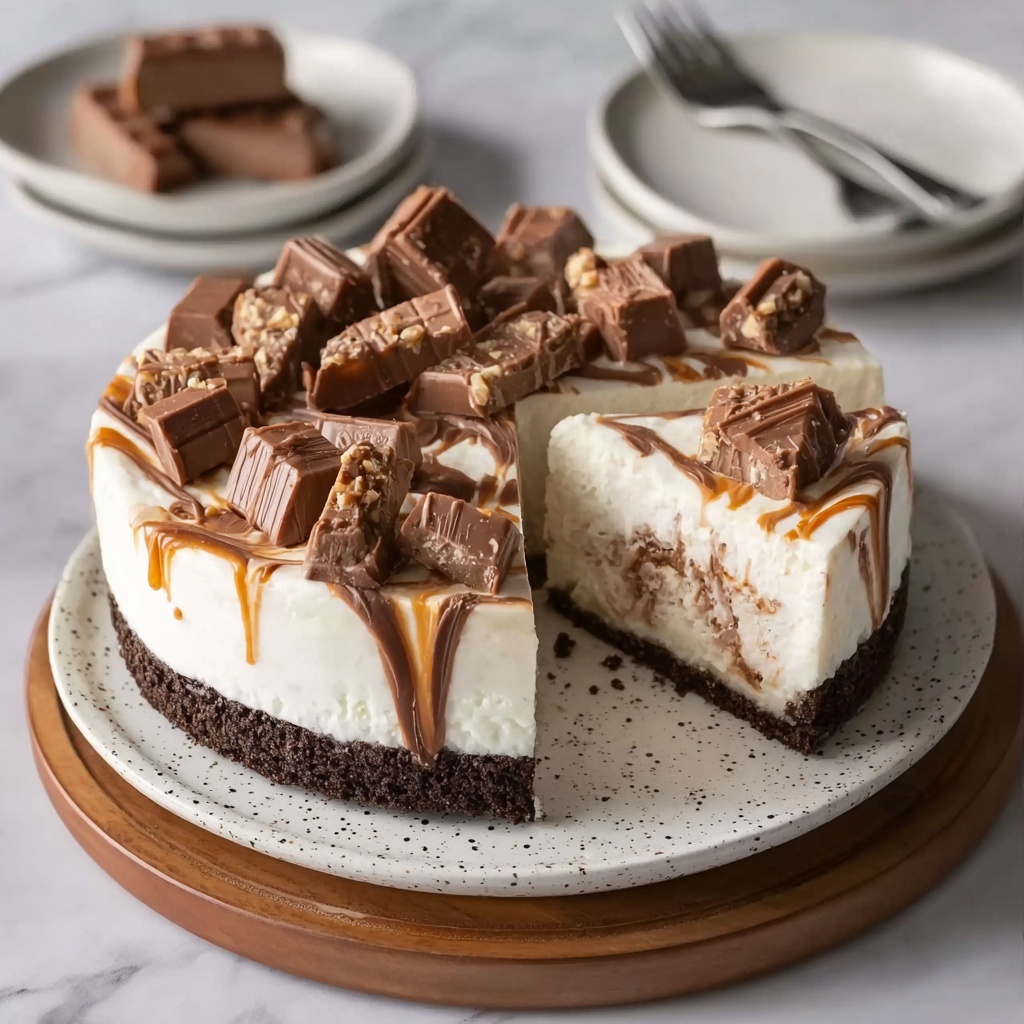
The moment you taste this No-Bake Kinder Bueno Cheesecake Recipe, prepare to fall head over heels for its luscious creaminess paired with delightful crunches of Kinder Bueno pieces. This indulgent dessert offers the perfect balance of smooth hazelnut spread mingling with the buttery biscuit base, all topped off with a glossy chocolate drizzle that promises to wow anyone lucky enough to dig in. It is surprisingly simple to assemble yet delivers an impressive, dreamy treat that’s ideal for gatherings or whenever you crave a sweet escape. Get ready to discover a new favorite that transforms no-bake cheesecakes into a silky, nutty delight loaded with chocolatey fun.
Ingredients You’ll Need
This recipe shines because of its straightforward, pantry-friendly ingredients, each chosen carefully to create a harmonious taste and texture. From the crunchy biscuit base to the creamy, dreamy filling and the irresistible sprinkling of chocolate and Kinder Bueno pieces, every component plays a crucial role in building this dessert’s magic.
- Digestive biscuits or graham crackers (2 cups, crushed): Your crunchy base delivering the perfect buttery foundation for the cheesecake.
- Unsalted butter (½ cup, melted): Binds the biscuit crumbs together, adding richness and a smooth texture.
- Cream cheese (16 oz, softened): The silky, tangy star that forms the cheesecake’s creamy body.
- Powdered sugar (1 cup): Sweetens smoothly without graininess, blending beautifully into the filling.
- Heavy whipping cream (1 ½ cups, cold): Whipped to stiff peaks for lightness, it gives the filling that fluffy, melt-in-your-mouth quality.
- Vanilla extract (1 tsp): Adds subtle warmth and depth to the creamy filling.
- Hazelnut spread (1 cup, like Nutella): The rich, nutty component that makes this cheesecake utterly irresistible.
- Kinder Bueno bars (4, chopped): Brings in delightful chunks of creamy-filled chocolate for texture and flavor bursts.
- Milk chocolate (½ cup, melted): Poured over the top for a glossy, decadent finish that’s visually stunning and tasty.
- Whipped cream swirls: Perfect for garnishing with a light, cloud-like touch.
- Kinder Bueno pieces: To scatter generously over the top for extra crunch and charm.
- Chocolate shavings: Adds elegance and an additional layer of chocolate goodness.
How to Make No-Bake Kinder Bueno Cheesecake Recipe
Step 1: Prepare the Biscuit Base
Start by crushing your digestive biscuits or graham crackers into fine crumbs. You want enough crushed pieces to create a sturdy base but still with some texture to enjoy in every bite. Mix these crumbs with melted unsalted butter until everything is evenly coated and crumbly in texture, making sure the butter binds the crumbs together. Then firmly press this mixture into the bottom of a springform pan, forming an even, compact layer that will hold the creamy filling securely. Pop it into the fridge to chill while you whip up the luscious filling.
Step 2: Make the Cream Cheese Filling
In a large mixing bowl, beat the softened cream cheese with powdered sugar until perfectly smooth and creamy—no lumps here! In a separate clean bowl, whip the heavy whipping cream to firm peaks. This step is crucial as the whipped cream lightens the denser cream cheese, creating that classic cheesecake fluffiness. Gently fold the whipped cream into the cream cheese mixture using a spatula, taking care to keep as much air in the mix as possible for that airy texture.
Step 3: Blend in Hazelnut and Kinder Bueno
Next, add the hazelnut spread to the fluffy mixture and fold it in slowly until everything is smooth and harmoniously combined. The hazelnut spread is what elevates this cheesecake from ordinary to extraordinary — rich, nutty, and utterly addictive. Now, gently fold in the chopped Kinder Bueno pieces, which add exciting bursts of creamy hazelnut and crispy wafer throughout the filling.
Step 4: Assemble and Chill
Spread your heavenly cheesecake filling evenly over the chilled biscuit base with a spatula, smoothing the top for a sleek finish. This is the moment where all your hard work layers into one dreamy dessert. Place the entire cheesecake into the refrigerator and chill for at least 6 hours or overnight to allow it to set perfectly—patience here assures the best texture and flavor melding.
Step 5: Finish with Chocolate and Garnishes
When your cheesecake is set and ready, pour melted milk chocolate over the top, swirling it gently to create that irresistibly glossy sheen. Finally, garnish with swirls of whipped cream, extra Kinder Bueno chunks, and sprinkles of chocolate shavings. These thoughtful touches provide that wow factor in both texture and presentation, inviting everyone to dig right in.
How to Serve No-Bake Kinder Bueno Cheesecake Recipe
Garnishes
The garnish is your playground for creativity and fun. I adore using fresh whipped cream swirls because they add lightness that pairs beautifully with the richness of the cheesecake. Don’t forget those crunchy Kinder Bueno pieces scattered on top—they deliver delightful texture contrasts. A sprinkle of chocolate shavings finishes the look with a professional touch and extra chocolate flavor that melts on your tongue. These garnishes make serving this cheesecake feel extra special.
Side Dishes
This cheesecake pairs wonderfully with fresh berries, such as raspberries or strawberries, which lend a slightly tart brightness that balances the creamy sweetness. For a cozy vibe, a scoop of vanilla bean ice cream can complement the hazelnut-chocolate flavors beautifully. If you want to keep it simple, a cup of freshly brewed coffee or rich espresso elevates the dessert experience, especially after a hearty meal.
Creative Ways to Present
Serve slices on rustic wooden boards or delicate dessert plates to suit your occasion’s style. For casual gatherings, try individual mini cheesecake portions in jars topped with whole Kinder Bueno pieces—these are charming and easy to serve. Another fun idea is to drizzle a contrasting white chocolate on the top or create layered parfaits that echo this cheesecake’s divine flavors. Presentation can transform this already incredible recipe into a showstopper centerpiece.
Make Ahead and Storage
Storing Leftovers
This No-Bake Kinder Bueno Cheesecake Recipe keeps beautifully in the fridge for up to 3 days. Keep it covered tightly with plastic wrap or in an airtight container to maintain texture and prevent it from absorbing any fridge odors. The creamy filling stays luscious while the biscuit base retains its subtle crunch, making your leftovers just as delightful as the first slice.
Freezing
If you want to prepare this cheesecake well in advance, it freezes well for up to 1 month. Wrap it tightly with plastic wrap and then aluminum foil to prevent freezer burn. When you’re ready to indulge, thaw the cheesecake overnight in the refrigerator to maintain its creamy texture and avoid sogginess. This makes it a fantastic make-ahead dessert for busy weeks or special celebrations.
Reheating
Since this is a no-bake cheesecake, reheating is not recommended—this dessert is best enjoyed chilled to preserve its signature creamy texture and fresh flavors. If you prefer a slightly softer slice, let it sit at room temperature for 10 to 15 minutes before serving to enhance its melt-in-your-mouth quality without compromising the structure.
FAQs
Can I substitute the digestive biscuits with something else?
Absolutely! Graham crackers are a popular alternative and work just as well for the crust, delivering a similar texture and flavor. You could also experiment with chocolate cookies for a richer base, but keep in mind it will alter the taste slightly.
Is it necessary to use a springform pan?
Using a springform pan makes it easier to remove the cheesecake without damaging its sides. If you don’t have one, a regular round cake pan lined with parchment paper can work, but be extra cautious when unmolding.
Can I use a different hazelnut spread?
Yes! Any quality hazelnut spread will do the trick. If you prefer a lighter or less sweet option, look for varieties with lower sugar content or consider homemade hazelnut chocolate spread if you want full control over flavor.
How do I know when the whipped cream is ready?
Whip the cream until stiff peaks form, meaning when you lift your whisk or beaters out, the peaks stand straight without folding over. This ensures the filling will be airy and hold its shape well.
Can I make this cheesecake vegan or dairy-free?
While this recipe is not originally designed for vegan or dairy-free diets, you can experiment by using dairy-free cream cheese, plant-based whipping cream, and vegan butter. Bear in mind texture and flavor may vary somewhat from the classic.
Final Thoughts
There’s nothing quite like the indulgent joy that a No-Bake Kinder Bueno Cheesecake Recipe brings to your table—rich hazelnut flavors, creamy texture, and chocolatey crunch all wrapped up in one show-stopping dessert. It’s incredibly satisfying to make, stunning to serve, and absolutely irresistible to eat. Whether you’re a seasoned cheesecake lover or someone looking to try a fuss-free yet spectacular dessert, this recipe is sure to become a treasured favorite you’ll make time and again.
Print
No-Bake Kinder Bueno Cheesecake Recipe
- Prep Time: 30 minutes
- Cook Time: 0 minutes
- Total Time: 6 hours 30 minutes
- Yield: 8 servings
- Category: Dessert
- Method: No-Cook
- Cuisine: International
Description
This decadent no-bake Kinder Bueno cheesecake combines a buttery biscuit crust with a creamy hazelnut-infused filling studded with crunchy Kinder Bueno pieces. Topped with melted milk chocolate, whipped cream swirls, and chocolate shavings, this rich and indulgent dessert requires no baking and sets in the fridge, making it perfect for easy entertaining or special occasions.
Ingredients
Crust
- 2 cups digestive biscuits or graham crackers, crushed
- ½ cup unsalted butter, melted
Filling
- 16 oz (450 g) cream cheese, softened
- 1 cup powdered sugar
- 1 ½ cups heavy whipping cream, cold
- 1 tsp vanilla extract
- 1 cup hazelnut spread (like Nutella)
- 4 Kinder Bueno bars, chopped
Topping
- ½ cup milk chocolate, melted
- Whipped cream swirls
- Kinder Bueno pieces, for garnish
- Chocolate shavings
Instructions
- Prepare the crust: Mix the crushed digestive biscuits or graham crackers thoroughly with the melted unsalted butter until the mixture resembles wet sand.
- Form the base: Press this buttery biscuit mixture firmly and evenly into the base of a springform pan to create the crust layer. Place the pan in the refrigerator to chill while you make the filling.
- Make the cream cheese mixture: In a large mixing bowl, beat the softened cream cheese along with the powdered sugar until the mixture is smooth and lump-free.
- Whip the cream: In a separate chilled bowl, whip the heavy whipping cream and vanilla extract until stiff peaks form, ensuring it holds shape when the whisk is lifted.
- Combine mixtures: Gently fold the whipped cream into the cream cheese mixture, preserving the airiness for a light texture.
- Add hazelnut spread: Stir in the hazelnut spread thoroughly until fully incorporated and the filling is creamy and homogeneous.
- Incorporate Kinder Bueno pieces: Carefully fold the chopped Kinder Bueno bars into the filling, distributing them evenly throughout.
- Assemble cheesecake: Spread the filling mixture evenly over the chilled crust in the springform pan. Smooth the top with a spatula for an even surface.
- Chill to set: Refrigerate the cheesecake for at least 6 hours or preferably overnight to allow it to firm up properly.
- Add topping: Once set, pour the melted milk chocolate evenly over the top of the cheesecake for a glossy finish.
- Decorate: Garnish with swirls of whipped cream, additional chunks of Kinder Bueno bars, and chocolate shavings to enhance appearance and texture.
- Serve: Carefully slice the cheesecake and serve chilled, enjoying the creamy hazelnut-chocolate combination.
Notes
- For best results, ensure the cream cheese is fully softened before mixing to avoid lumps.
- Use cold heavy cream straight from the fridge for optimal whipping volume.
- Allow the cheesecake to chill at least 6 hours to ensure it slices cleanly.
- Store leftovers covered in the refrigerator for up to 3 days.
- The cake can be made a day ahead to save time on the day of serving.
- Use a serrated knife warmed with hot water to slice neat pieces without cracking.


