
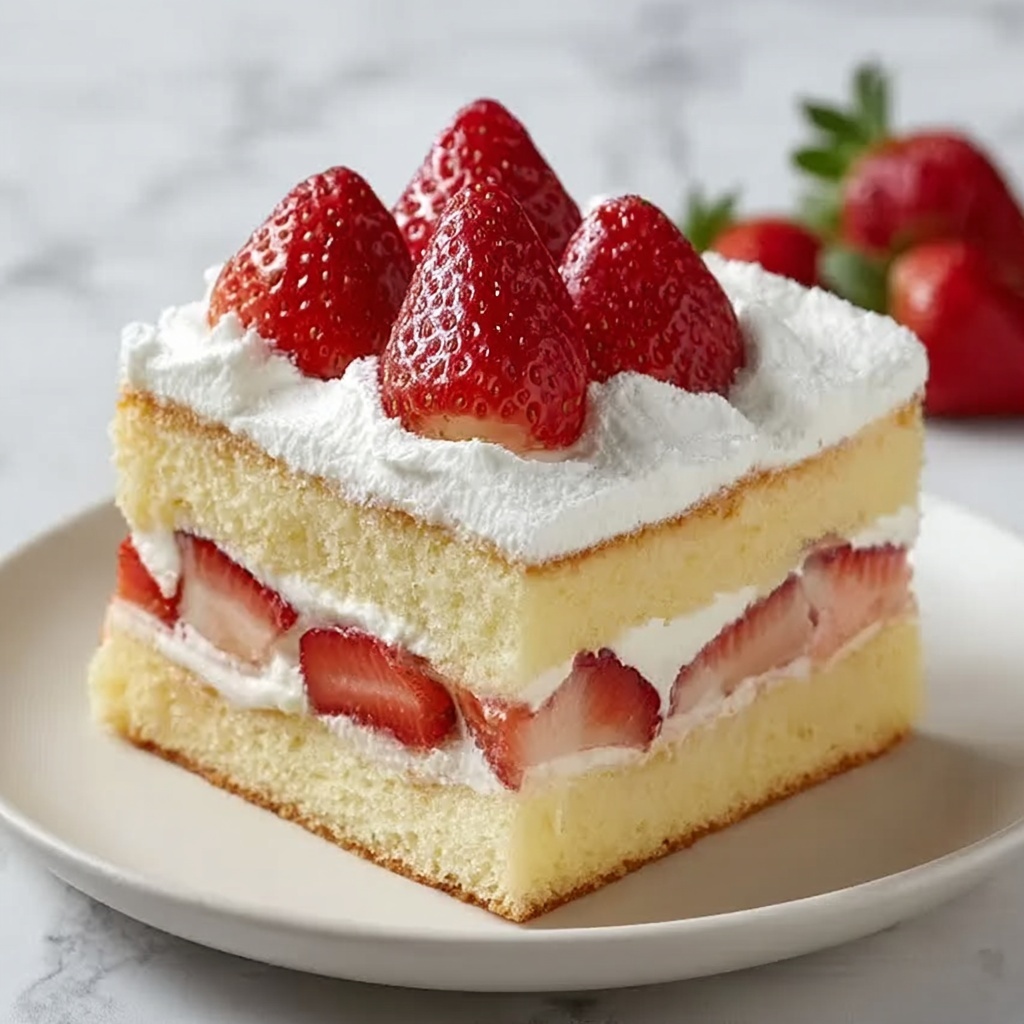
If you’re searching for the perfect light yet indulgent dessert, this Japanese Strawberry Sponge Cake (Strawberry Shortcake) Recipe will absolutely steal your heart. It’s a dreamy combination of airy sponge cake, fluffy whipped cream, and juicy fresh strawberries that balances sweetness and freshness flawlessly. Whether for a special celebration or a comforting weekend treat, this cake brings an elegant simplicity that makes every bite feel like a little moment of joy.
Ingredients You’ll Need
The beauty of this recipe lies in its straightforward ingredients, each playing a vital role in creating the delicate texture, subtle sweetness, and bright color of the cake. Using fresh, quality components will truly elevate your Japanese Strawberry Sponge Cake (Strawberry Shortcake) Recipe.
- 4 large eggs, at room temperature: These provide structure and airiness, making the sponge incredibly light and fluffy.
- 2/3 cup (130g) granulated sugar: Adds the perfect level of sweetness and helps stabilize the egg mixture when whisked.
- 2/3 cup (85g) cake flour, sifted: Cake flour ensures a soft crumb by having a lower protein content than all-purpose flour.
- 2 tablespoons milk: Adds moisture and tenderness to the sponge batter.
- 2 tablespoons unsalted butter, melted: Infuses richness and a silky texture without weighing down the cake.
- 1 teaspoon vanilla extract: Lends a warm, inviting aroma that complements the strawberries beautifully.
- 1 1/2 cups (360ml) heavy whipping cream, chilled: Whipped into light peaks, this cream is the luscious filling and topping that defines this shortcake.
- 3 tablespoons powdered sugar: Sweetens the whipped cream delicately without graininess.
- 1 teaspoon vanilla extract: Added to the cream for a subtle flavor boost.
- 2 cups fresh strawberries, hulled and halved: The star of the show; ripe berries bring vibrant color and juicy sweetness.
- Additional strawberries for topping: For an attractive, fresh finish that makes the cake pop visually.
How to Make Japanese Strawberry Sponge Cake (Strawberry Shortcake) Recipe
Step 1: Preheat and Prepare Your Pan
First things first, preheat your oven to 350°F (175°C). Line an 8-inch (20cm) round cake pan with parchment paper. This ensures the sponge cake will release easily after baking without sticking or breaking — a crucial step for that flawless cake texture.
Step 2: Make the Sponge Cake Batter
Next, whisk your eggs and sugar gently over warm water. This warming step helps dissolve the sugar and brings the mixture to a perfect temperature for beating. Then, using an electric mixer, whip until the batter triples in volume and becomes thick and pale. This aeration is what gives your sponge cake that signature lightness and springy texture.
Step 3: Incorporate Dry Ingredients and Butter Mixture
Carefully fold in the sifted cake flour. Folding rather than stirring preserves the air bubbles in the batter. In a separate bowl, combine melted butter, milk, and vanilla extract. Gently fold this mix into the batter, adding richness and moisture while keeping the airy structure intact.
Step 4: Bake the Cake
Pour your batter into the prepared pan and bake for 25 to 30 minutes. The sponge is done when it’s golden, springs back lightly to the touch, and a skewer inserted in the center comes out clean. Allow it to cool in the pan for 10 minutes before transferring the cake onto a wire rack to cool completely. This prevents sogginess and readies the cake for assembly.
Step 5: Prepare the Whipped Cream
While the cake cools, whip your chilled heavy cream with powdered sugar and vanilla extract until it holds soft peaks. Take care not to over-whip, or it could become grainy. This whipped cream will layer between and on top of your sponge, delivering that luscious, melt-in-your-mouth experience.
Step 6: Assemble Your Japanese Strawberry Sponge Cake (Strawberry Shortcake) Recipe
Slice your cooled sponge horizontally into two equal layers using a serrated knife for clean cuts. Spread a generous layer of whipped cream on one side, then arrange halved strawberries over it. Add a bit more cream on top before placing the second sponge layer. Finally, cover the entire cake with the remaining whipped cream for a beautifully smooth finish.
Step 7: Garnish and Chill
Decorate with additional whole strawberries arranged in a pretty pattern on top. This not only amps up the strawberry flavor but makes the cake irresistibly photogenic. Chill the cake in the fridge for at least one hour to allow flavors to meld and the cream to set perfectly before slicing and serving.
How to Serve Japanese Strawberry Sponge Cake (Strawberry Shortcake) Recipe

Garnishes
Complement the natural beauty of the cake with a light dusting of powdered sugar or even edible flower petals for a whimsical touch. Fresh mint leaves also add a delightful pop of green and a refreshing aroma that pairs wonderfully with the strawberries.
Side Dishes
This cake shines best on its own, but you can elevate the experience with a side of matcha tea or a simple bowl of fresh berries to keep the fruity theme vibrant. For a brunch setting, pair it with a crisp glass of sparkling water infused with citrus slices for balance.
Creative Ways to Present
Try slicing the cake into petite individual portions and serve in clear glasses layered with extra whipped cream and berries for a deconstructed shortcake parfait. Another fun idea is to add a drizzle of strawberry sauce or a spoonful of homemade jam to each plate for an extra burst of flavor and color.
Make Ahead and Storage
Storing Leftovers
Keep any leftover Japanese Strawberry Sponge Cake (Strawberry Shortcake) Recipe refrigerated, covered tightly with plastic wrap or in an airtight container to prevent the whipped cream from absorbing fridge odors. It will stay fresh for up to two days, but it’s best enjoyed sooner for that fluffy texture.
Freezing
This cake is best enjoyed fresh, but if you need to freeze it, consider freezing the sponge layers separately without cream and strawberries. Wrap tightly in plastic wrap and then foil, and freeze for up to one month. Thaw in the refrigerator before assembling your cake.
Reheating
Since the cake is delicate and layered with whipped cream, reheating is not recommended. Instead, serve chilled for the best taste and texture. If you froze the sponge layers separately, warm them gently in a low oven (about 300°F/150°C) wrapped in foil for a few minutes before assembling.
FAQs
Can I use frozen strawberries in this recipe?
Fresh strawberries are ideal for this Japanese Strawberry Sponge Cake (Strawberry Shortcake) Recipe because they retain their shape and freshness better. However, if using frozen strawberries, thaw and drain them well to avoid a soggy cake.
Is cake flour necessary?
Using cake flour helps achieve the delicate, tender crumb characteristic of this sponge cake. If you don’t have cake flour, you can substitute by mixing all-purpose flour with a bit of cornstarch, but the texture might be slightly less soft.
How do I prevent the whipped cream from becoming grainy?
Make sure your heavy cream is very cold before whipping and stop as soon as soft peaks form. Over-whipping causes the fat to separate and the cream to become grainy and eventually turn into butter.
Can I make this cake vegan or dairy-free?
Traditional Japanese Strawberry Sponge Cake (Strawberry Shortcake) Recipe relies on eggs and dairy for its structure and richness. However, there are vegan alternatives to whipped cream and egg replacements you could experiment with, though the texture and flavor will vary.
How do I slice the sponge cake evenly?
Use a long serrated knife and a gentle sawing motion. You can also mark the cutting line lightly with toothpicks around the edge to guide your cut. Chilling the cake slightly before slicing can help reduce crumbling.
Final Thoughts
This Japanese Strawberry Sponge Cake (Strawberry Shortcake) Recipe is truly a celebration of simple ingredients transformed into something magical and irresistible. The clouds of sponge, creamy whipped layers, and sweet strawberries will win over anyone lucky enough to share a slice. I encourage you to try making it yourself — it’s easier than you think and deeply satisfying to enjoy. Trust me, once you taste it, it might just become your new favorite dessert to make and share.
Print
Japanese Strawberry Sponge Cake (Strawberry Shortcake) Recipe
- Prep Time: 20 minutes
- Cook Time: 30 minutes
- Total Time: 1 hour 10 minutes
- Yield: 8 servings
- Category: Dessert
- Method: Baking
- Cuisine: Japanese
- Diet: Vegetarian
Description
This Japanese Strawberry Sponge Cake, also known as Strawberry Shortcake, is a light and fluffy dessert featuring an airy sponge cake layered with freshly whipped cream and juicy strawberries. Perfectly balanced sweetness and delicate vanilla notes make it an elegant treat for any occasion.
Ingredients
Sponge Cake
- 4 large eggs, at room temperature
- 2/3 cup (130g) granulated sugar
- 2/3 cup (85g) cake flour, sifted
- 2 tablespoons milk
- 2 tablespoons unsalted butter, melted
- 1 teaspoon vanilla extract
Whipped Cream
- 1 1/2 cups (360ml) heavy whipping cream, chilled
- 3 tablespoons powdered sugar
- 1 teaspoon vanilla extract
Fruit
- 2 cups fresh strawberries, hulled and halved
- Additional whole strawberries for topping
Instructions
- Preheat the Oven: Preheat your oven to 350°F (175°C). Line an 8-inch (20cm) round cake pan with parchment paper to ensure the cake releases easily after baking.
- Make the Sponge Cake Batter: Whisk the eggs and granulated sugar together over a warm water bath until the sugar fully dissolves. Remove from heat and beat the mixture with an electric mixer until it becomes thick, pale, and triples in volume, ensuring a light sponge.
- Incorporate Dry and Wet Ingredients: Gently fold the sifted cake flour into the egg mixture to preserve the airiness. In a small bowl, combine melted butter, milk, and vanilla extract, then carefully fold this mixture into the batter for richness and flavor.
- Bake the Cake: Pour the batter into the prepared pan and place it in the preheated oven. Bake for 25 to 30 minutes until a toothpick inserted comes out clean. Let the cake cool for 10 minutes in the pan before transferring it to a wire rack to cool completely.
- Prepare the Whipped Cream: Using a chilled bowl, beat the heavy whipping cream, powdered sugar, and vanilla extract until soft peaks form. This cream will add a smooth, velvety texture to the cake.
- Assemble the Cake: Once the sponge cake is cooled, slice it horizontally into two even layers. Spread a generous layer of whipped cream on the bottom sponge layer, arrange the halved strawberries evenly over the cream, then add a bit more whipped cream on top of the strawberries. Place the second layer of sponge cake on top and cover it with the remaining whipped cream.
- Garnish and Serve: Decorate the top of the cake with whole fresh strawberries for a beautiful presentation. Chill the cake in the refrigerator for at least 1 hour before serving to allow the flavors to meld and the cream to set.
Notes
- Use room temperature eggs to achieve better volume in the sponge cake.
- Ensure the heavy cream and bowl are well chilled to make whipping easier and achieve soft peaks.
- Be gentle when folding flour and butter mixture to keep the batter airy for a light sponge.
- This cake is best served fresh but can be stored in the refrigerator for up to 2 days.
- For a gluten-free version, substitute cake flour with a gluten-free baking mix suitable for cakes.


