
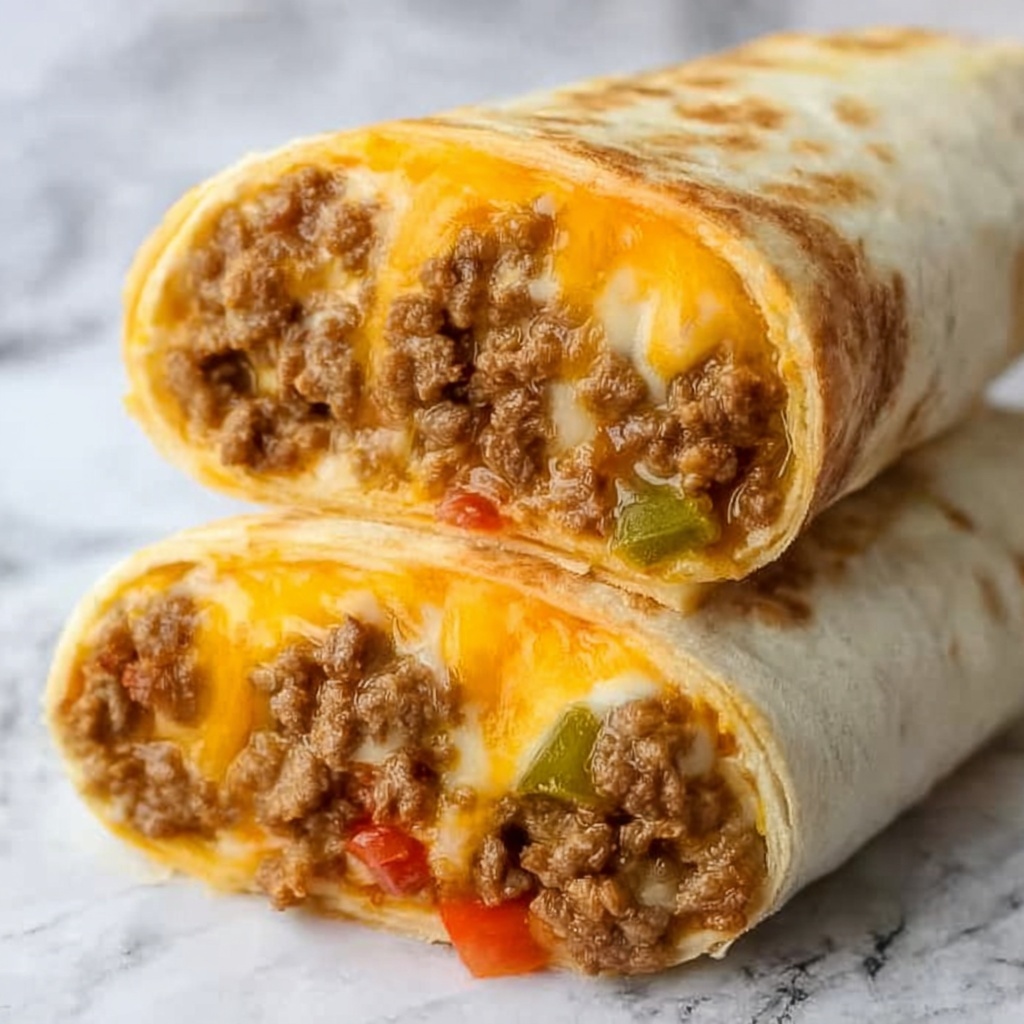
If you’ve ever wished for a quick yet satisfying meal that combines all the best parts of a cheeseburger into a handheld delight, you’re going to fall in love with this Easy Air Fryer Cheeseburger Wraps Recipe. It takes everything you adore about a juicy, cheesy burger but wraps it up neatly and crisps it to perfection in the air fryer, creating a deliciously golden exterior with a melty, savory center. Whether it’s a busy weeknight or a weekend treat, these wraps are sure to become a favorite in your rotation.
Ingredients You’ll Need
The beauty of this Easy Air Fryer Cheeseburger Wraps Recipe lies in its simple, straightforward ingredients. Each one plays a crucial role—from the savory seasoned beef and creamy cheese to the tangy pickles and buttery tortillas—building layers of flavor and texture you’ll crave.
- 1 pound ground beef: Choose a good-quality ground beef with some fat for juicy, flavorful meat.
- 4 (10-inch) flour tortillas: Soft but sturdy enough to hold all the fillings without tearing.
- 4 slices American cheese: For that irresistibly creamy melt that defines a classic cheeseburger.
- 1 tablespoon mayonnaise: Adds creaminess and a subtle tang that balances the wrap.
- 1 tablespoon ketchup: Brings a hint of sweetness and depth, just like your fave burger sauce.
- 16 sliced pickles: For a crisp, zesty punch that brightens each bite.
- 1 tablespoon melted butter: Brushed on the tortilla to achieve a golden, crispy finish in the air fryer.
- ½ teaspoon salt: Essential for seasoning and enhancing the beef’s natural flavor.
- ½ teaspoon ground black pepper: Adds a mild heat and depth.
- 1 tablespoon garlic powder: Infuses the beef with a savory richness.
How to Make Easy Air Fryer Cheeseburger Wraps Recipe
Step 1: Cook the Ground Beef
Start by heating a large pan over medium heat. Add your ground beef seasoned with salt, pepper, and garlic powder. Cook until the beef is nicely browned and crumbly, stirring occasionally to ensure even cooking. This rich, perfectly seasoned meat forms the flavorful heart of your cheeseburger wraps.
Step 2: Prepare the Tortillas
While the beef cooks, soften your tortillas by microwaving them for about 15 seconds with a damp paper towel on top. This step makes them pliable and easier to roll. Spread a thin, even layer of mayonnaise and ketchup on each tortilla—this combo mimics classic burger condiments and keeps your wraps moist and tasty.
Step 3: Assemble the Wraps
Now comes the fun part! Layer pickles, a slice of American cheese, and a generous portion of the cooked beef onto each tortilla. Then, roll each tortilla tightly like a burrito. Once rolled, brush each wrap with the melted butter. This buttery coating is key to achieving that crave-worthy crispy, golden crust during air frying.
Step 4: Air Fry the Wraps
Preheat your air fryer to around 370°F (188°C). Place the wraps seam-side down in the basket to help keep them closed. Cook for about 8–10 minutes, or until the tortillas turn beautifully golden and crisp. Optionally, you can brush a little more butter on them halfway through cooking for extra richness. The air fryer creates a perfectly crunchy exterior that contrasts wonderfully with the gooey cheese and juicy beef inside.
Step 5: Serve and Enjoy
Once cooked, carefully remove the wraps and let them cool for a minute or two—this helps the cheese set slightly and makes them easier to handle. You can cut them in half for easier eating or enjoy them whole for a filling, handheld treat. These wraps are a guaranteed crowd-pleaser that combines convenience and flavor in each bite.
How to Serve Easy Air Fryer Cheeseburger Wraps Recipe

Garnishes
Adding a fresh garnish like chopped lettuce or a few slices of ripe tomato can brighten the savory richness of these wraps. A sprinkle of chopped fresh herbs like parsley or chives adds an unexpected pop of color and freshness, making each plate feel thoughtfully prepared.
Side Dishes
Classic sides like crispy oven-baked fries or a crunchy coleslaw perfectly complement these cheeseburger wraps. For a lighter option, a simple green salad with a zesty vinaigrette helps balance the richness of the beef and cheese.
Creative Ways to Present
To make your Easy Air Fryer Cheeseburger Wraps Recipe extra special, serve them with a trio of dipping sauces such as spicy mustard, ranch dressing, or a tangy BBQ sauce. Wrapping each with parchment paper and tying with kitchen twine not only looks charming but also keeps everything neat and easy to handle for casual entertaining.
Make Ahead and Storage
Storing Leftovers
If you find yourself with leftovers, simply wrap each cool wrap tightly in plastic wrap or foil and store them in an airtight container in the refrigerator. They will stay fresh for up to 2 days, maintaining good texture and flavor.
Freezing
These wraps freeze beautifully! Wrap each one securely with foil or plastic wrap and place in a freezer-safe bag. Freeze for up to 2 months. When ready to enjoy, thaw overnight in the fridge before reheating.
Reheating
To reheat, pop the wraps back into your air fryer for 3 to 5 minutes at 350°F (175°C) until warmed through and crispy again. This method restores that fantastic crunch without making them soggy like a microwave would.
FAQs
Can I use different kinds of cheese in this recipe?
Absolutely! While American cheese melts beautifully and gives that classic cheeseburger flavor, feel free to experiment with cheddar, pepper jack, or any cheese that melts well to customize your wraps.
What if I don’t have an air fryer?
You can bake the wraps in a preheated oven at 400°F (205°C) for about 10-15 minutes, turning halfway, until golden and crispy. While the air fryer is ideal for that perfect crunch, the oven is a great alternative.
Can I make this recipe vegetarian?
Yes! Substitute the ground beef with plant-based crumbles or seasoned sautéed mushrooms for a delicious vegetarian version that still delivers on texture and flavor.
How do I prevent the wraps from opening while cooking?
Rolling the tortillas tightly and brushing the seam side with melted butter before cooking helps keep them sealed. Placing them seam side down in the air fryer also locks them in place as they crisp up.
Are these wraps suitable for kids?
Definitely. They’re a fun and tasty way to enjoy cheeseburger flavors in a kid-friendly, easy-to-handle wrap format. Adjust the seasoning and pickles according to your child’s taste preferences.
Final Thoughts
There’s something truly satisfying about combining familiar, comforting flavors with the convenience of quick preparation, and that’s exactly what this Easy Air Fryer Cheeseburger Wraps Recipe delivers. It’s perfect for busy days, family dinners, or anytime you want a deliciously cheesy, crispy meal without the fuss. Give it a try—you might just find a new go-to recipe that everyone in the house will love as much as you do!
Print
Easy Air Fryer Cheeseburger Wraps Recipe
- Prep Time: 10 minutes
- Cook Time: 10 minutes
- Total Time: 20 minutes
- Yield: 4 servings
- Category: Snack
- Method: Air Frying
- Cuisine: American
Description
These Easy Air Fryer Cheeseburger Wraps are a quick and delicious way to enjoy all the classic cheeseburger flavors wrapped up in a crispy, golden tortilla. Ground beef seasoned with garlic powder, salt, and pepper is cooked to perfection, then combined with American cheese, pickles, mayo, and ketchup. Wrapped in a soft flour tortilla and air fried until golden and buttery, these wraps make for a perfect snack or meal in just 20 minutes.
Ingredients
Meat and Seasoning
- 1 pound ground beef
- ½ teaspoon salt
- ½ teaspoon ground black pepper
- 1 tablespoon garlic powder
Wraps
- 4 (10-inch) flour tortillas
- 4 slices American cheese
- 1 tablespoon mayonnaise
- 1 tablespoon ketchup
- 16 sliced pickles
- 1 tablespoon melted butter (plus extra for brushing)
Instructions
- Cook the Ground Beef: In a large pan over medium heat, add the ground beef along with salt, black pepper, and garlic powder. Cook, stirring occasionally, until the beef is fully browned and cooked through. Once done, remove from heat and set aside.
- Prepare Tortillas: Place the flour tortillas on a microwave-safe plate and cover with a damp paper towel. Microwave for about 20-30 seconds to soften the tortillas for easier rolling. Spread approximately half a tablespoon of mayonnaise and ketchup on each tortilla evenly.
- Assemble Wraps: On each tortilla, layer 4 slices of pickles, one slice of American cheese, and an equal portion of the cooked ground beef. Carefully roll up each tortilla tightly like a burrito. Brush the outside of each wrap with melted butter to enhance browning and flavor.
- Air Fry: Preheat your air fryer to 370°F (188°C). Place the assembled wraps seam-side down in the air fryer basket to prevent unrolling. Cook for 6-8 minutes or until the wraps are golden brown and crispy. Optionally, brush more melted butter on the wraps halfway through cooking for extra richness.
- Serve: Remove the wraps from the air fryer and let them cool slightly on a cutting board. Slice if desired and serve warm to enjoy the melty, savory cheeseburger flavors in a convenient handheld wrap.
Notes
- Ensure tortillas are softened before assembling to prevent cracking during rolling.
- For a lower calorie option, use lean ground beef or substitute with ground turkey.
- Adjust seasoning in the beef to your taste preferences, adding onion powder or smoked paprika if desired.
- Use non-stick spray or parchment paper in the air fryer basket if worried about sticking.
- These wraps reheat well in the air fryer for a few minutes to regain crispiness.


