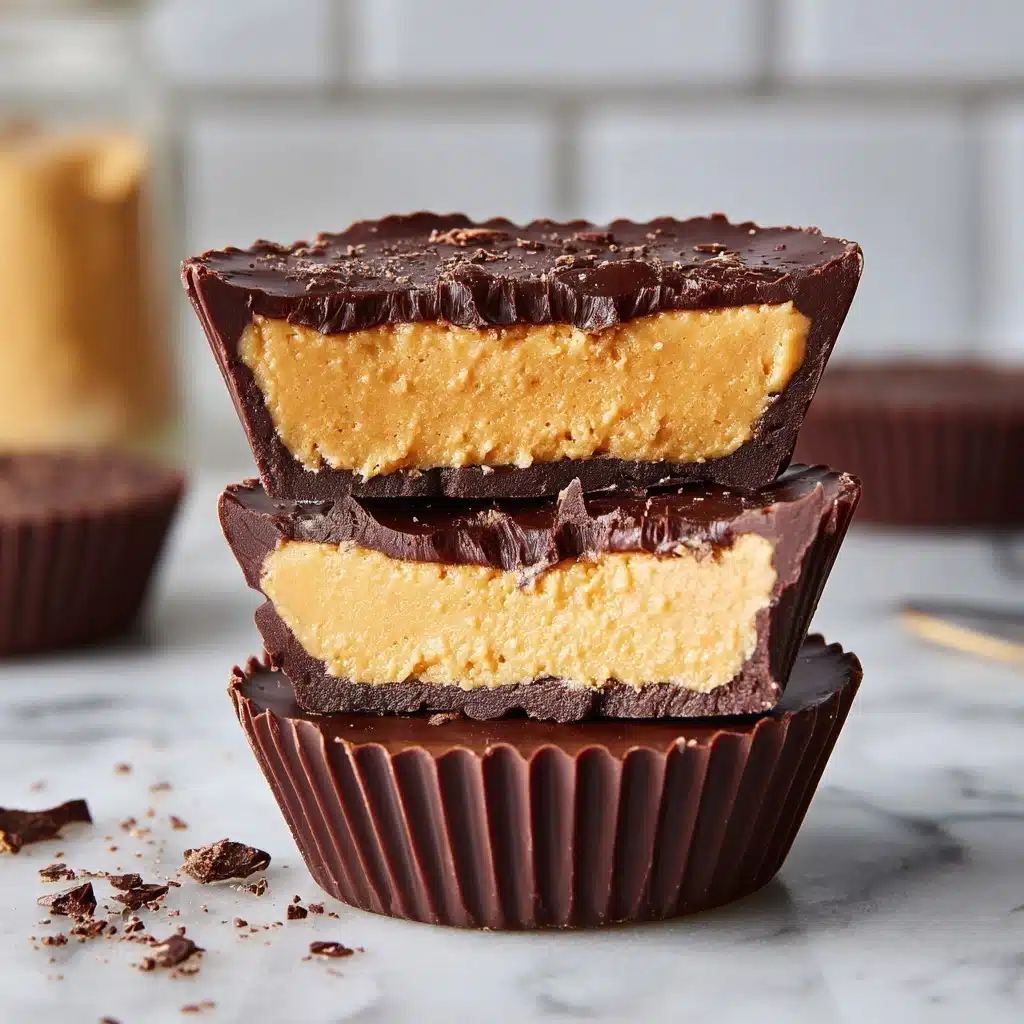
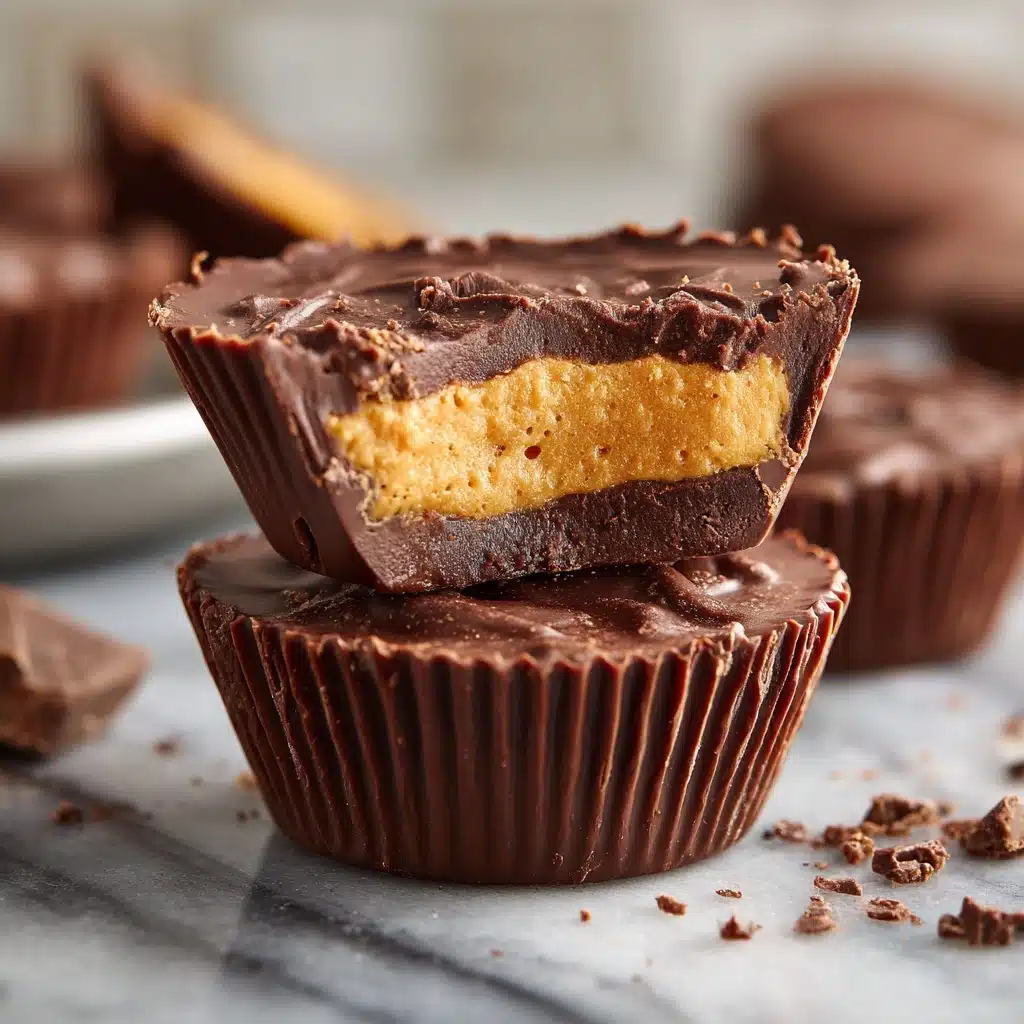
Protein Peanut Butter Cups Recipe
If you’re on the hunt for a treat that satisfies both your sweet tooth and your protein needs, let me introduce you to these Protein Peanut Butter Cups. Imagine the familiar, nostalgic joy of classic peanut butter cups, but upgraded with a protein boost — so you can genuinely enjoy every bite guilt-free! Not only are they irresistibly creamy and chocolatey, but they’re also no-bake, gluten-free, and switch up easily for your favorite nut butters or protein flavors. Once you try making these at home, there’s a very good chance store-bought cups just won’t compare.
Ingredients You’ll Need
This recipe is all about quality ingredients coming together in the simplest, most delicious way. Each part brings something special to the texture, flavor, and irresistible appearance of these Protein Peanut Butter Cups.
- Dark Chocolate Chips or Chopped Dark Chocolate: Choose a chocolate with 60 to 75 percent cocoa for a rich flavor and beautiful glossy coating.
- Coconut Oil: Helps the chocolate melt smoothly and gives the cups a delicate snap right out of the fridge.
- Natural Peanut Butter: Creamy peanut butter is essential for that classic nutty center – go for natural for fewer additives and a smoother texture.
- Vanilla or Chocolate Protein Powder: Just one scoop adds a subtle flavor boost and turns these cups into a genuinely satisfying snack.
- Honey or Maple Syrup: Sweetens the filling naturally, and you can adjust to taste or use maple syrup for a vegan option.
- Pinch of Salt: Don’t skip it — it wakes up all the flavors and leaves you craving just one more cup!
How to Make Protein Peanut Butter Cups
Step 1: Prepare Your Muffin Tin
Start by lining a muffin tin with 12 paper liners. This not only makes the Protein Peanut Butter Cups super easy to remove, but it also helps them keep their adorable shape. If you don’t have paper liners, a little swipe of coconut oil inside each cup will work in a pinch!
Step 2: Melt the Chocolate and Coconut Oil
Combine your dark chocolate chips and coconut oil in a microwave-safe bowl, then microwave in 20-second increments, stirring in between, until everything is silky smooth. If you have a double boiler, you can use that method instead for extra control over the melt. The coconut oil ensures your chocolate has the perfect consistency and shine.
Step 3: Create the Chocolate Base
Spoon about a teaspoon of melted chocolate into the bottom of each paper liner. Tilt the tin gently or use the back of your spoon to create an even layer across the bottom. Slide the tin into your freezer for 5 minutes, just long enough to set the chocolate and prevent the filling from sinking right through.
Step 4: Make the Protein Peanut Butter Filling
In a small bowl, stir together the peanut butter, protein powder, honey or maple syrup, and a pinch of salt until the mixture is completely smooth. It should be thick enough to scoop or gently roll into little balls. If it feels too sticky, add an extra sprinkle of protein powder for easy handling.
Step 5: Layer the Peanut Butter Mixture
Scoop about a teaspoon of your protein peanut butter mixture and flatten it slightly between your palms. Place one portion on top of each chocolate layer in the muffin tin. This is your chance to pack in an extra bit of protein and that classic creamy center!
Step 6: Top and Set the Cups
Cover each peanut butter disc with the remaining melted chocolate, making sure to spread it all the way to the edges to completely encase the filling. Pop the tin back into the freezer or refrigerator for 20 to 30 minutes, or until the Protein Peanut Butter Cups are fully set and ready to devour.
How to Serve Protein Peanut Butter Cups

Garnishes
Add a little extra flair by sprinkling flaky sea salt, a drizzle of melted peanut butter, or a few chopped roasted peanuts right on top before the cups set. Not only does this look tempting, but it also balances the rich sweetness with just the right hint of crunch or saltiness.
Side Dishes
While these cups are absolutely delightful on their own, they also shine as the star of a protein-packed snack platter. Pair them with fresh fruit (like strawberries or banana slices), a handful of mixed nuts, or serve alongside a homemade smoothie for an energizing treat any time of day.
Creative Ways to Present
Stack a few Protein Peanut Butter Cups in a small jar tied with ribbon for a thoughtful homemade gift, or arrange them in colorful cupcake liners on a wooden board for a party-ready dessert display. You can even make mini versions by using a mini muffin tin for a cute, bite-sized option!
Make Ahead and Storage
Storing Leftovers
Keep any leftover Protein Peanut Butter Cups chilled in an airtight container in your refrigerator. They’ll stay fresh, firm, and delicious for up to one week. Because of the natural peanut butter, the texture stays creamy and satisfying even after a few days.
Freezing
If you like to meal-prep snacks, these cups freeze beautifully. Arrange them in a single layer or with parchment between layers in a freezer-safe container. They last up to three months — just thaw in the fridge overnight whenever you crave one!
Reheating
You don’t actually need to reheat these, but if you enjoy a gooier bite, leave your Protein Peanut Butter Cups at room temperature for 10 minutes before eating. This softens the chocolate just enough for extra creaminess without melting completely.
FAQs
Can I use a different nut butter in this recipe?
Absolutely! Almond butter or cashew butter both work wonderfully, so feel free to swap in your favorite or whatever you have on hand. Each nut butter brings its own unique flavor and texture to your Protein Peanut Butter Cups.
Will any protein powder work?
For the best results, use a protein powder you already like the taste of, since the flavor will come through in the filling. Both plant-based and whey options work, but make sure it mixes well and doesn’t have a chalky aftertaste.
How do I make these Protein Peanut Butter Cups vegan?
Just use a plant-based protein powder and maple syrup instead of honey. Double-check that your chocolate is dairy-free and you’ll have a completely vegan, protein-rich treat ready to go!
Can I add extra mix-ins to the filling?
Definitely — try a pinch of cinnamon, mini chocolate chips, or even crushed pretzels stirred into the filling for creative twists. Just don’t overload it or the cups might not set as firmly.
Why is the chocolate sometimes dull or sticky?
If your chocolate looks dull or is sticky, it might have been overheated or cooled too slowly. Use gentle heat and chill the cups quickly in the freezer or fridge to keep the chocolate layer shiny and satisfying to bite into.
Final Thoughts
There’s something magical about making your own Protein Peanut Butter Cups — the simple ingredients, the luscious layers, and that unbeatable feeling of pulling them from the fridge when you need a pick-me-up. Give these a try, share them with friends, and watch them become your new favorite homemade snack!
Print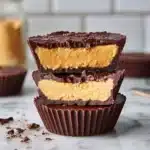
Protein Peanut Butter Cups Recipe
- Total Time: 30 minutes
- Yield: 12 cups 1x
- Diet: Vegetarian
Description
Indulge in these Protein Peanut Butter Cups for a guilt-free treat that satisfies your sweet tooth and protein needs. These delicious cups are easy to make and perfect for a quick snack or dessert.
Ingredients
For the Chocolate Layer:
1 cup dark chocolate chips or chopped dark chocolate, 2 tablespoons coconut oil.
For the Peanut Butter Filling:
½ cup natural peanut butter, 1 scoop vanilla or chocolate protein powder, 2 tablespoons honey or maple syrup, pinch of salt
Instructions
- Prepare Chocolate Layer: Line a muffin tin with 12 paper liners. Melt dark chocolate and coconut oil until smooth. Spoon 1 teaspoon of melted chocolate into each liner, spread evenly, and freeze for 5 minutes.
- Make Peanut Butter Filling: In a bowl, mix peanut butter, protein powder, honey, and salt until smooth. Form small balls or scoops, flatten slightly, and place one portion on each chocolate layer.
- Complete the Cups: Cover with remaining melted chocolate, ensuring the peanut butter layer is fully coated. Freeze or refrigerate for 20–30 minutes until set. Store in the fridge.
Notes
- You can substitute almond or cashew butter for peanut butter.
- For a vegan option, use plant-based protein powder and maple syrup.
- Adjust sweetness by varying the amount of honey used.
- Prep Time: 15 minutes
- Cook Time: 0 minutes
- Category: Snack, Dessert
- Method: No-Bake
- Cuisine: American
Nutrition
- Serving Size: 1 cup
- Calories: 150
- Sugar: 6 g
- Sodium: 60 mg
- Fat: 10 g
- Saturated Fat: 5 g
- Unsaturated Fat: 5 g
- Trans Fat: 0 g
- Carbohydrates: 12 g
- Fiber: 2 g
- Protein: 6 g
- Cholesterol: 0 mg