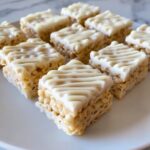
Description
Delightfully creamy and crunchy, these Cheesecake Rice Krispie Treats combine the classic marshmallow treat with a luscious cheesecake twist. Perfectly soft cream cheese blends with sweet powdered sugar and vanilla, mingling with crispy Rice Krispies coated in melted butter. Chilled to set, these no-bake treats are ideal for easy dessert anytime.
Ingredients
Scale
Main Ingredients
- 4 cups Rice Krispies
- 1 cup cream cheese, softened
- 1/2 cup powdered sugar
- 1/2 cup whipped topping
- 1/4 cup butter
- 1 teaspoon vanilla extract
Instructions
- Mix the cheesecake base: In a large bowl, thoroughly combine the softened cream cheese, powdered sugar, and vanilla extract until smooth and creamy, creating the cheesecake mixture.
- Prepare Rice Krispies mixture: In a separate microwave-safe or stovetop-safe bowl, melt the butter completely. Once melted, add the Rice Krispies cereal and gently stir until all the cereal pieces are evenly coated with butter.
- Combine mixtures: Pour the buttery Rice Krispies into the cream cheese mixture. Fold together gently until all the cereal is fully incorporated and the mixture is evenly blended.
- Press into pan: Lightly grease a baking pan and transfer the mixture into it. Using a spatula or your hands, press the mixture firmly and evenly into the pan to form a compact layer for optimal shaping.
- Chill to set: Place the pan in the refrigerator and chill for approximately 2 hours. This step allows the mixture to firm up and meld into chewy, sliceable bars.
- Serve: Remove from refrigerator, cut the set mixture into squares or desired shapes, and serve chilled for a refreshing treat.
Notes
- Use softened cream cheese for easier mixing and smoother texture.
- Press mixture firmly into the pan to help bars hold together after chilling.
- For variations, add mix-ins like chocolate chips, berries, or nuts before chilling.
- Store treats in an airtight container in the refrigerator for up to 3 days to maintain freshness.