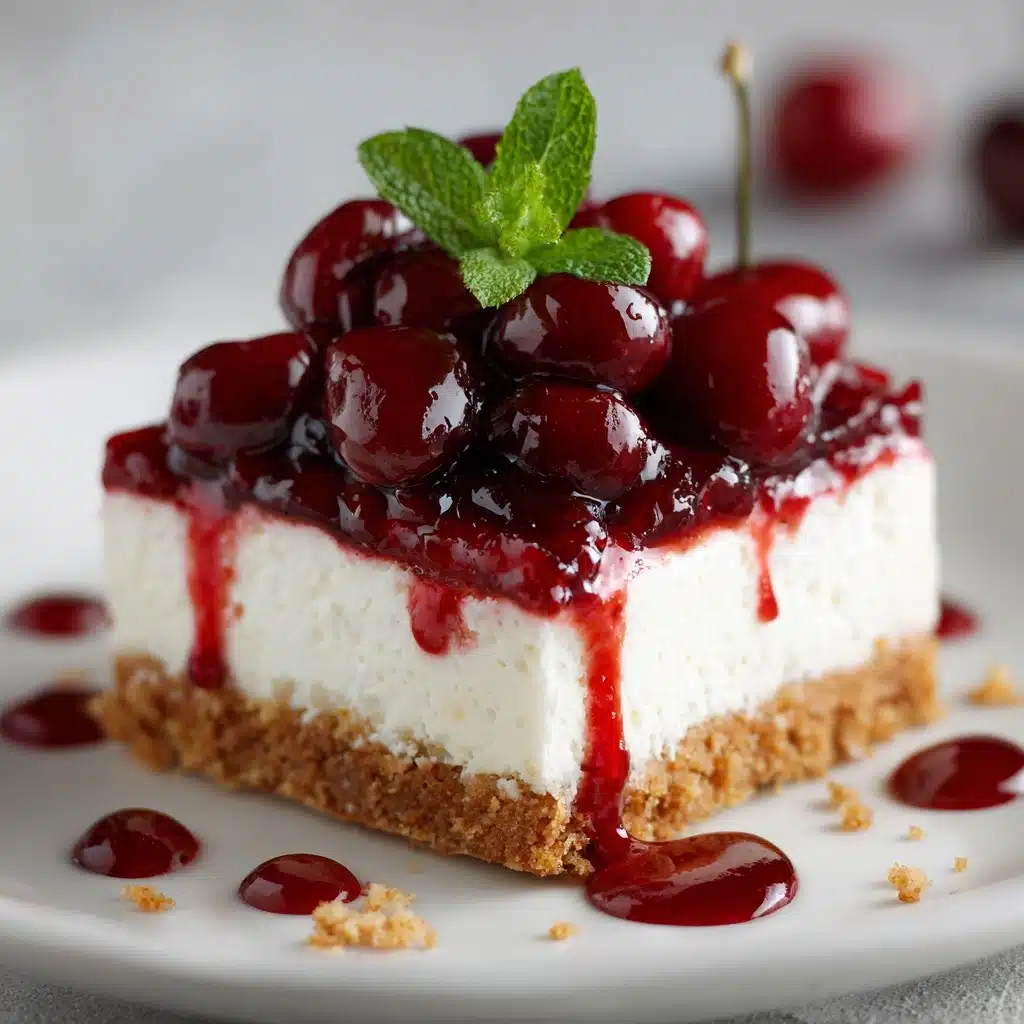
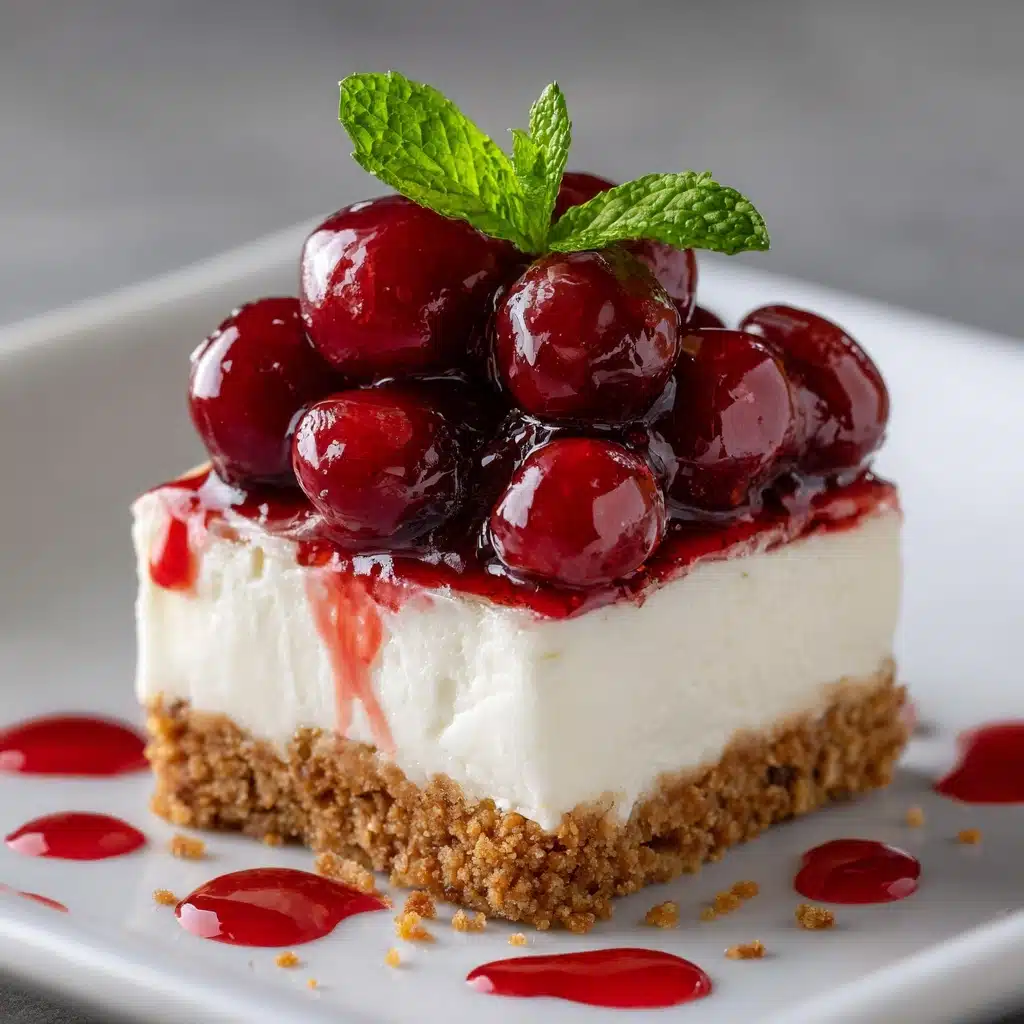
Cherry Cheesecake Lush Recipe
If you’re on the hunt for a showstopping dessert that looks impressive but is secretly simple, let me introduce you to Cherry Cheesecake Lush. This no-bake layered treat packs a punch of creamy cheesecake flavor, buttery graham cracker crust, and tangy-sweet cherries all in one dreamy bite. It’s the kind of dessert that disappears quickly at parties and leaves everyone begging for the recipe, and you’ll love how easy it is to whip up for any occasion.
Ingredients You’ll Need
What I love most about this recipe is how a handful of basic ingredients come together to make something truly spectacular. Each element contributes its own magic—whether it’s crunch, creaminess, or a burst of fruit—so don’t skip any for the full Cherry Cheesecake Lush experience!
- Graham cracker crumbs: The essential foundation, bringing a buttery crunch and a nostalgic flavor that sets the stage for every layer.
- Unsalted butter (melted): Acts as the glue for your crust and gives it that rich, indulgent taste.
- Granulated sugar: Just enough to sweeten up the crust without making it cloying.
- Cream cheese (softened): The star of the show—make sure it’s at room temperature for the smoothest, creamiest layer.
- Powdered sugar: Blends seamlessly into the cream cheese to bring a gentle sweetness and silky texture.
- Vanilla extract: A splash goes a long way to add warmth and depth to the creamy filling.
- Whipped topping (such as Cool Whip): Lends fluffy lightness to the cheesecake and pudding layers, making them irresistible.
- Instant cheesecake pudding mix: Adds a fast, foolproof cheesecake flavor with zero fuss.
- Cold milk: Just the thing for activating the pudding and making it perfectly thick and creamy.
- Cherry pie filling: The vibrant, glossy finish that ties it all together with a sweet-tart pop of fruit.
How to Make Cherry Cheesecake Lush
Step 1: Build the Buttery Graham Cracker Crust
Start by mixing your graham cracker crumbs, melted butter, and granulated sugar in a medium bowl. Stir until every crumb glistens and the texture resembles wet sand. Press this mixture evenly and firmly into the bottom of a 9×13-inch baking dish. If you love a crispier base, you can bake it for 8 minutes at 350°F, then cool completely. Otherwise, pop it in the fridge to chill while you prepare the next layers—either way, your crust will be the delicious backbone of your Cherry Cheesecake Lush.
Step 2: Whip Up the Cream Cheese Layer
In a large bowl, beat your softened cream cheese until it’s completely smooth and fluffy. Add in the powdered sugar and vanilla extract, mixing until well combined and luscious. Next, gently fold in 1 cup of whipped topping. You want this layer to be light and airy, so use a spatula and take your time. Spread this creamy mixture evenly over your chilled crust, making sure to reach every corner.
Step 3: Create the Cheesecake Pudding Layer
Grab a separate bowl and whisk together the instant cheesecake pudding mix and cold milk. Whisk for about 2 minutes until it thickens up and looks silky. Fold in your remaining 1 cup of whipped topping to make this layer extra fluffy and smooth. Carefully dollop and spread this pudding mixture over the cream cheese layer, using a gentle hand to keep those layers distinct for that classic Cherry Cheesecake Lush look.
Step 4: Top with Cherries and Chill
Finally, spoon the cherry pie filling evenly over the top, spreading it gently so you don’t disturb the beautiful layers beneath. The cherries add a jewel-like finish and a burst of color that makes this dessert totally irresistible. Cover the dish and refrigerate for at least 4 hours, or overnight if you have the time—this lets the layers set perfectly and the flavors meld into cheesecake bliss.
How to Serve Cherry Cheesecake Lush
Garnishes
For an extra flourish, try finishing each slice with a swirl of fresh whipped cream, a sprinkle of graham cracker crumbs, or even a few fresh cherries on top. These little touches make every piece of Cherry Cheesecake Lush look bakery-worthy and add a pop of flavor and texture you’ll love.
Side Dishes
Since Cherry Cheesecake Lush is rich and satisfying, you’ll want to balance it with something light on the side. A platter of fresh berries, a simple fruit salad, or even a cup of coffee or tea makes the ideal pairing, helping to refresh your palate between creamy bites.
Creative Ways to Present
Take your Cherry Cheesecake Lush to the next level by serving it in individual jars for picnics, in elegant parfait glasses for dinner parties, or as bite-sized squares for a dessert buffet. No matter how you present it, those gorgeous layers and vibrant cherries will steal the show!
Make Ahead and Storage
Storing Leftovers
Simply cover your dish tightly with plastic wrap or transfer leftovers to an airtight container. Cherry Cheesecake Lush will keep beautifully in the refrigerator for up to 3 days. The flavors deepen as it sits, so leftovers are a delicious treat!
Freezing
If you want to prep ahead even further, Cherry Cheesecake Lush can be frozen before adding the cherry topping. Wrap the assembled (but untopped) dessert tightly and freeze for up to a month. Thaw in the fridge overnight and add the cherries just before serving for the freshest flavor and texture.
Reheating
This dessert is best served chilled, so there’s no need to reheat. If it’s been in the freezer, just allow it to thaw slowly in the refrigerator for several hours before digging in. That way, every layer stays creamy and dreamy.
FAQs
Can I use homemade whipped cream instead of store-bought?
Absolutely! Homemade whipped cream is a fantastic way to make your Cherry Cheesecake Lush even more decadent and rich. Just be sure it’s whipped to stiff peaks so it holds up in the layers.
Is it possible to make this dessert gluten-free?
You can easily swap out the regular graham cracker crumbs for gluten-free ones. All the other ingredients are naturally gluten-free, so your Cherry Cheesecake Lush will be just as delicious for everyone!
Can I substitute other fruit fillings?
Definitely. While cherry pie filling is classic, feel free to use blueberry, strawberry, or even a mix of your favorite fruits. Each variation brings a new twist to Cherry Cheesecake Lush and keeps things exciting.
How far ahead can I make Cherry Cheesecake Lush?
This dessert is perfect for making ahead! Prepare it up to 24 hours in advance and keep it refrigerated. The layers actually benefit from the extra time to set and develop flavor.
What’s the best way to slice and serve it?
For clean slices, use a sharp knife dipped in hot water and wiped dry between cuts. A flat spatula helps lift each square neatly, showing off those gorgeous Cherry Cheesecake Lush layers.
Final Thoughts
I hope you’re as excited as I am to try this Cherry Cheesecake Lush recipe! It’s the kind of crowd-pleasing dessert that brings people together and turns any day into a celebration. Give it a whirl—you’ll be amazed at how easy and delicious it is, and I promise it’ll earn a spot in your favorites list.
Print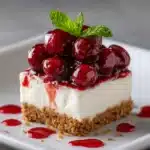
Cherry Cheesecake Lush Recipe
- Total Time: 4 hours 25 minutes
- Yield: 12 servings 1x
- Diet: Non-Vegetarian
Description
Cherry Cheesecake Lush is a luscious no-bake layered dessert featuring a crunchy graham cracker crust, creamy cream cheese and pudding layers, topped with sweet cherry pie filling. This easy-to-make American classic boasts rich flavors and a delightful texture perfect for any occasion.
Ingredients
Crust
- 1 1/2 cups graham cracker crumbs
- 1/2 cup unsalted butter, melted
- 1/4 cup granulated sugar
Cream Cheese Layer
- 8 ounces cream cheese, softened
- 1 cup powdered sugar
- 1 teaspoon vanilla extract
- 1 cup whipped topping (such as Cool Whip)
Pudding Layer
- 1 (3.4-ounce) box instant cheesecake pudding mix
- 1 1/2 cups cold milk
- 1 cup whipped topping (such as Cool Whip)
Topping
- 1 (21-ounce) can cherry pie filling
Instructions
- Prepare the crust: In a medium bowl, combine graham cracker crumbs, melted butter, and granulated sugar until the mixture is fully integrated. Press the mixture firmly into the bottom of a 9×13-inch baking dish to create an even crust layer. Place in the refrigerator to chill while preparing the other layers.
- Make the cream cheese layer: In a large bowl, beat the softened cream cheese until smooth and creamy. Add powdered sugar and vanilla extract, mixing thoroughly. Gently fold in 1 cup of whipped topping until the mixture is light and fluffy. Spread this evenly over the chilled crust.
- Prepare the pudding layer: In a separate bowl, whisk together the instant cheesecake pudding mix and cold milk until the mixture thickens, about 2 minutes. Fold in the remaining 1 cup of whipped topping carefully. Spread this pudding layer gently over the cream cheese layer to maintain distinct layers.
- Add the cherry topping: Spoon the cherry pie filling evenly over the pudding layer, ensuring complete coverage.
- Chill and set: Cover the assembled dish with plastic wrap and refrigerate for at least 4 hours, or preferably overnight, to allow the layers to set and flavors to meld. Serve chilled.
Notes
- For a crunchier base, bake the graham cracker crust at 350°F (175°C) for 8 minutes before cooling and assembling.
- Try swapping cherry pie filling with blueberry or strawberry pie filling for a different flavor profile.
- Use homemade whipped cream instead of store-bought for a fresher and richer taste.
- Prep Time: 25 minutes
- Cook Time: 0 minutes
- Category: Dessert
- Method: No-Bake
- Cuisine: American
Nutrition
- Serving Size: 1 square
- Calories: 360
- Sugar: 28g
- Sodium: 240mg
- Fat: 21g
- Saturated Fat: 11g
- Unsaturated Fat: 8g
- Trans Fat: 0g
- Carbohydrates: 38g
- Fiber: 1g
- Protein: 4g
- Cholesterol: 45mg