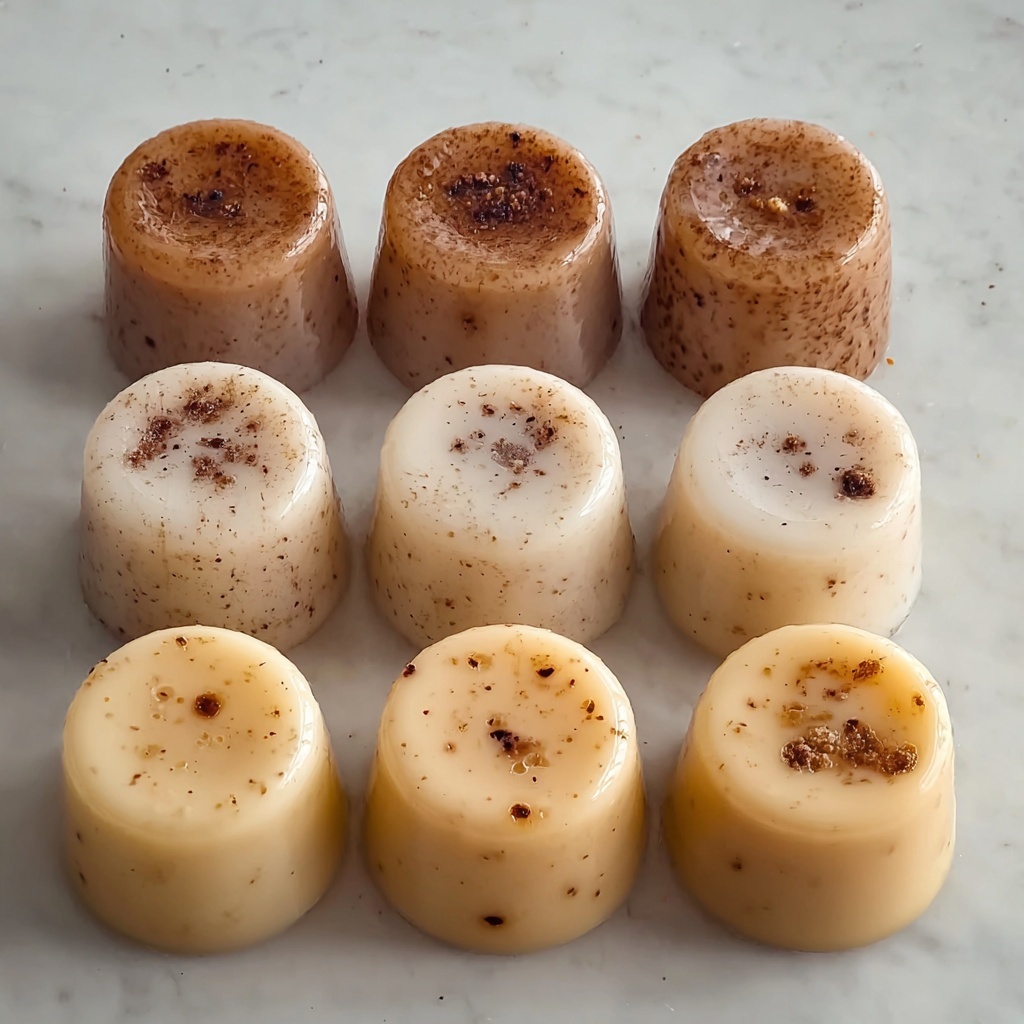
If you have been searching for a delightful way to pamper your skin at home, this DIY Exfoliating Sugar Scrub Bars for Silky Skin Bliss Recipe will quickly become your go-to treat. These gorgeous scrub bars combine the nourishing power of coconut oil and honey with the gentle exfoliation of sugar and ground oats, all wrapped up in a beautifully scented, solid soap bar. Not only do they leave your skin feeling smooth and refreshed, but they also make lovely gifts or a charming bathroom accessory. Get ready to dive into the simple, satisfying process of crafting these luscious bars that bring spa-level indulgence right to your fingertips.

Ingredients You’ll Need
Crafting these exfoliating scrub bars is refreshingly straightforward thanks to a handful of thoughtfully chosen ingredients. Each component plays a key role in creating the perfect blend of texture, scent, moisturizing benefits, and vibrant color, making every step an absolute joy.
- 1 cup Granulated Sugar: Acts as the primary exfoliant; brown sugar can be used for a gentler scrub.
- ½ cup Melt-and-Pour Soap Base: Provides structure and cleansing properties for the bars.
- ¼ cup Coconut Oil or Shea Butter: Deeply nourishes and hydrates your skin during exfoliation.
- 10–15 drops Essential Oils: Customize your bars with scents that soothe or invigorate.
- ½ teaspoon Natural Colorants: Add visual appeal using mica powder, beetroot powder, or turmeric.
- 1–2 tablespoons Dried Flowers: Optional touch of luxury and gentle texture, like lavender or chamomile.
- 5–10 drops Vitamin E Oil: Acts as a natural preservative and benefits skin health.
- 1–2 tablespoons Ground Oats or Coffee Grounds: Provides additional exfoliation tailored to your skin’s needs.
- 1 tablespoon Honey: Adds moisturizing properties and a subtle sweetness to the bars.
How to Make DIY Exfoliating Sugar Scrub Bars for Silky Skin Bliss Recipe
Step 1: Melt the Soap Base
Begin by chopping the melt-and-pour soap base into small, even chunks. This ensures a smooth and quick melt. Use a microwave-safe bowl or a double boiler to gently heat the soap until it becomes completely liquid. Stir occasionally to prevent any burning and to achieve a silky, even consistency — this will be the foundation for your scrub bars.
Step 2: Combine Oils and Essential Scents
Once melted, stir in the coconut oil or shea butter, allowing these rich moisturizers to blend seamlessly with the warm soap. Next, add your chosen essential oils; whether you prefer relaxing lavender, uplifting citrus, or calming chamomile, this step is all about infusing your bars with a scent that makes you smile every time you use them.
Step 3: Mix in Exfoliants and Moisturizers
Slowly fold in the granulated sugar until you get that perfect gritty texture that provides just the right amount of exfoliation. Then add your ground oats or coffee grounds for an extra buffing boost. Finish mixing in the honey, dried flowers, and drops of vitamin E oil. These ingredients elevate the bars, offering both skin nourishment and delightful bursts of color and texture.
Step 4: Pour Into Silicone Molds
Pour the luscious mixture evenly into silicone molds. Using a spatula or the back of a spoon, press down gently to ensure everything is compacted and no air pockets remain. The molds give your scrub bars their charming shape and make for easy removal once set.
Step 5: Cool and Unmold
Allow your bars to cool at room temperature for 1 to 2 hours until fully set. If you’re in a hurry, pop the molds into the refrigerator for about 30 minutes. Once firm, carefully unmold your scrub bars and get ready to revel in the fruits of your labor—smooth, fragrant, and truly skin-loving bars.
How to Serve DIY Exfoliating Sugar Scrub Bars for Silky Skin Bliss Recipe

Garnishes
Adding a few dried flower petals or a sprinkle of natural colorant powder on top of your bars before they set creates a charming, spa-like look. These little visual accents not only enhance the aesthetic but also offer a subtle sensory experience when using the scrub bars. Your skin routine will feel indulgent and special every time.
Side Dishes
While not a dish to eat alongside anything, these scrub bars pair perfectly with other self-care rituals. Think warm towels, soothing facial mists, or a luxurious body oil to follow up your exfoliation. Together, they create a multi-step pampering experience, transforming your skincare into an event you look forward to daily.
Creative Ways to Present
If giving these bars as gifts or displaying them in your bathroom, consider wrapping each one in simple kraft paper tied with twine or placing them in decorative tins. Using clear cellophane bags with a pretty ribbon or organizing them in a hand-painted wooden box also makes for a memorable presentation that matches the handmade charm of the scrub bars.
Make Ahead and Storage
Storing Leftovers
Once your scrub bars are completely cool and dry, store them in an airtight container to preserve their freshness and fragrance. Keep them in a cool, dry place away from humidity to maintain their solid texture and exfoliating power. Stored this way, your bars should stay good for several weeks.
Freezing
If you’d like to prepare these scrub bars in bulk, they freeze beautifully. Wrap each bar tightly in plastic wrap and place them in a freezer-safe container. When you’re ready to use one, simply let it thaw at room temperature for a short while before your next pampering session.
Reheating
Unlike food, these scrub bars should not be reheated, as excessive heat could melt their delicate structure and compromise their exfoliating texture. If a bar becomes too soft in warm weather, pop it in the fridge to firm up instead.
FAQs
Can I substitute ingredients in the DIY Exfoliating Sugar Scrub Bars for Silky Skin Bliss Recipe?
Absolutely! For example, swapping granulated sugar with brown sugar offers a gentler scrub, and you can swap coconut oil for shea butter depending on your skin’s needs. Feel free to tailor the essential oils and colorants to create a bar that suits you perfectly.
How often should I use these sugar scrub bars on my skin?
For most skin types, exfoliating 2-3 times a week is ideal. Over-exfoliation can irritate your skin, so listen to your body and adjust usage based on how your skin responds.
Are these scrub bars suitable for sensitive skin?
They can be, especially if you choose gentle exfoliants like fine sugar and oats and avoid harsh essential oils. Always patch test new products to ensure they agree with your skin before regular use.
Can I add other ingredients to the scrub bars?
Definitely! Ingredients like finely ground almonds or lavender buds add unique textures and scents, but be mindful of how abrasive they are to avoid irritating your skin.
How long do these DIY Exfoliating Sugar Scrub Bars for Silky Skin Bliss Recipe bars last?
Stored properly, these bars should last around 4-6 weeks. The vitamin E oil helps extend shelf life, but it’s best to use them within this timeframe for maximum freshness and benefit.
Final Thoughts
Making your own exfoliating scrub bars is not only an enjoyable crafting project but also a wonderful way to give your skin some extra love in the most natural, nourishing way possible. The DIY Exfoliating Sugar Scrub Bars for Silky Skin Bliss Recipe offers a personalized spa experience that’s affordable, effective, and deeply satisfying. Go ahead and try making these bars yourself — your skin will thank you with softness and glow!
Print
DIY Exfoliating Sugar Scrub Bars for Silky Skin Bliss Recipe
- Prep Time: 20 minutes
- Cook Time: 10 minutes
- Total Time: 2 hours 30 minutes
- Yield: 6 scrub bars
- Category: Skincare
- Method: No-Cook
- Cuisine: DIY Natural Skincare
Description
Create your own luxurious DIY exfoliating sugar scrub bars that combine gentle exfoliation with nourishing ingredients for silky, smooth skin. These bars blend melt-and-pour soap base, natural oils, sugar, and exfoliants like ground oats or coffee grounds, enhanced with essential oils and dried flowers for a spa-like experience at home.
Ingredients
Main Ingredients
- 1 cup Granulated Sugar (substitute with brown sugar for a softer scrub)
- ½ cup Melt-and-Pour Soap Base (adds structure and cleansing properties)
- ¼ cup Coconut Oil or Shea Butter (nourishes and hydrates the skin)
- 10–15 drops Essential Oils (customize with your favorite scents)
- ½ teaspoon Natural Colorants (mica powder, beetroot powder, or turmeric)
- 1–2 tablespoons Dried Flowers (lavender, rose petals, or chamomile)
- 5–10 drops Vitamin E Oil (natural preservative)
- 1–2 tablespoons Ground Oats or Coffee Grounds (for extra exfoliation)
- 1 tablespoon Honey (provides additional moisture)
Instructions
- Prepare Soap Base: Cut the melt-and-pour soap base into small chunks for easier melting.
- Melt Soap Base: Heat the soap base chunks in the microwave in short bursts or use a double boiler until completely melted, stirring occasionally to ensure a smooth consistency.
- Combine Oils and Essential Oils: Stir in the coconut oil or shea butter along with your chosen essential oils and vitamin E oil to the melted soap base to integrate moisturizing and aromatic properties.
- Add Colorants and Exfoliants: Mix in natural colorants such as mica powder or turmeric, then gradually incorporate granulated sugar, ground oats or coffee grounds, dried flowers, and honey until you achieve a gritty, exfoliating texture.
- Pour into Molds: Carefully pour the combined mixture into silicone molds, pressing down gently to compact the scrub thoroughly for shaping.
- Cool and Set: Let the bars cool at room temperature for 1 to 2 hours or speed up the process by refrigerating them for 30 minutes until fully set and firm.
- Unmold and Store: Remove the scrub bars from the molds and store them in an airtight container to preserve freshness and prolong shelf life.
Notes
- Use brown sugar instead of granulated sugar for a gentler scrub texture.
- Customize your scrub bars by choosing different essential oils such as lavender, peppermint, or citrus for various aromatic benefits.
- Natural colorants like beetroot powder or turmeric not only add color but may provide additional skin benefits.
- Dried flowers provide a decorative touch and mild natural fragrance but can be omitted if preferred.
- Store scrub bars in a dry, cool place to prevent them from softening or melting prematurely.

